Register Account

AI Earrings Try-On Tutorial: Create Realistic Model Photos

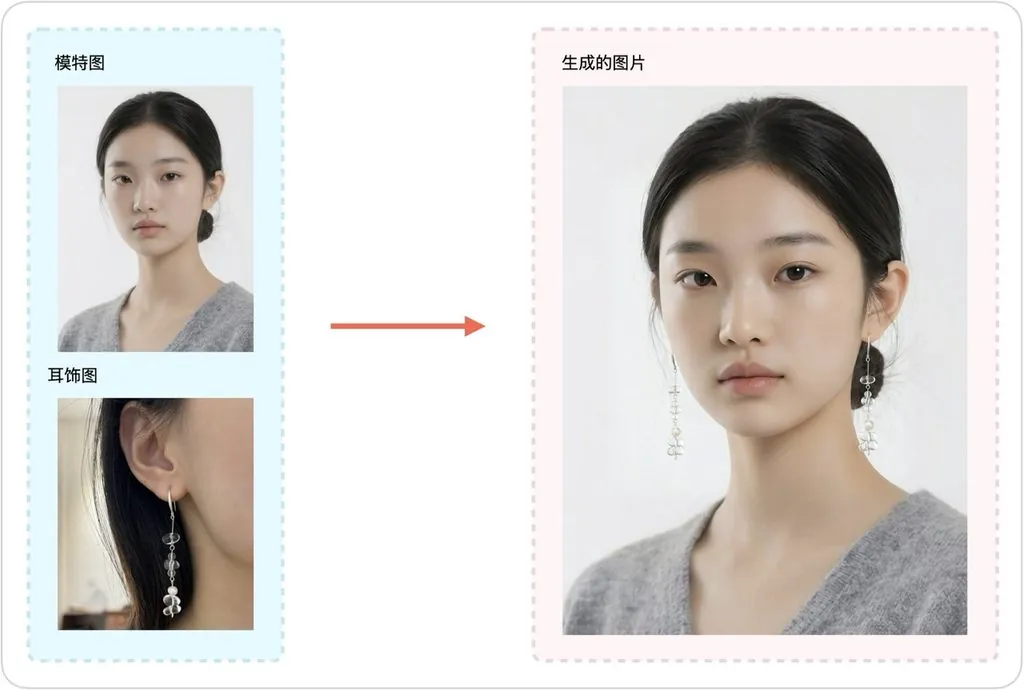
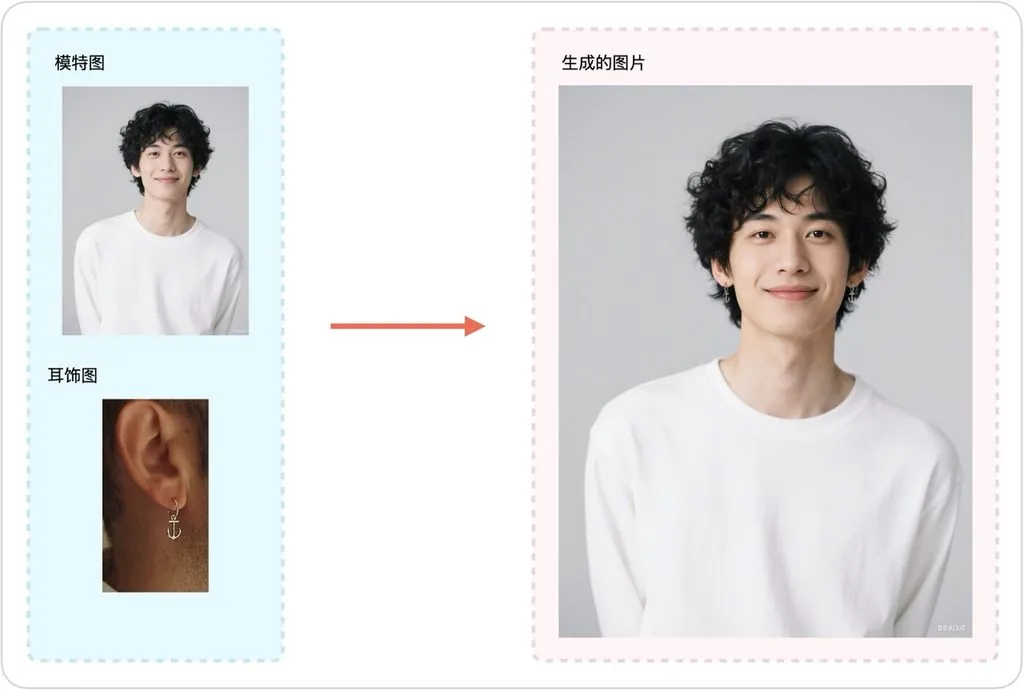
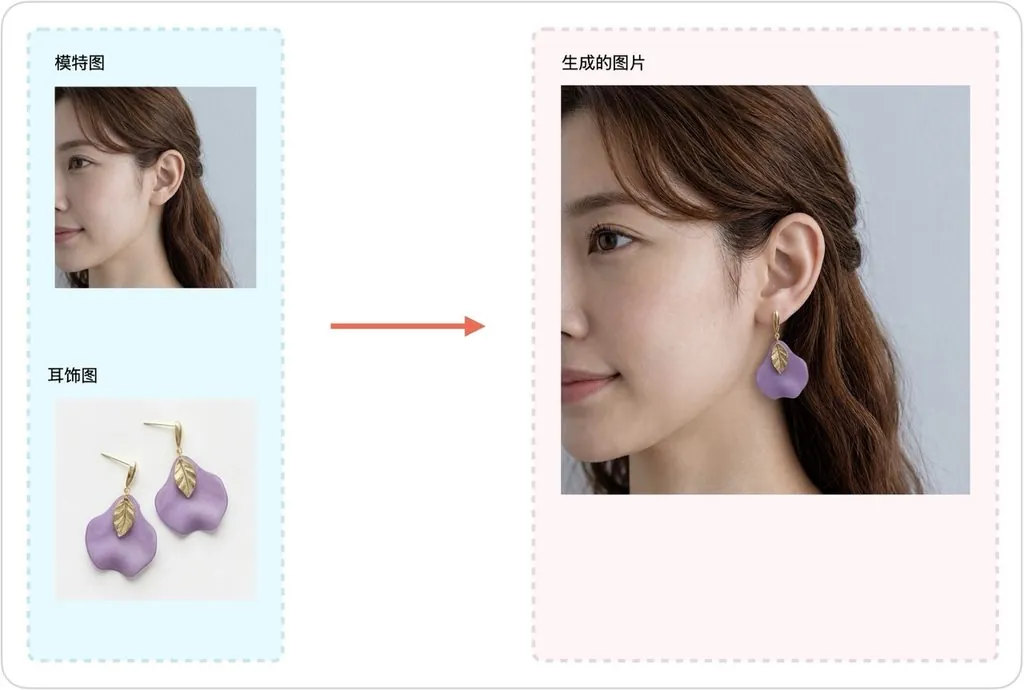
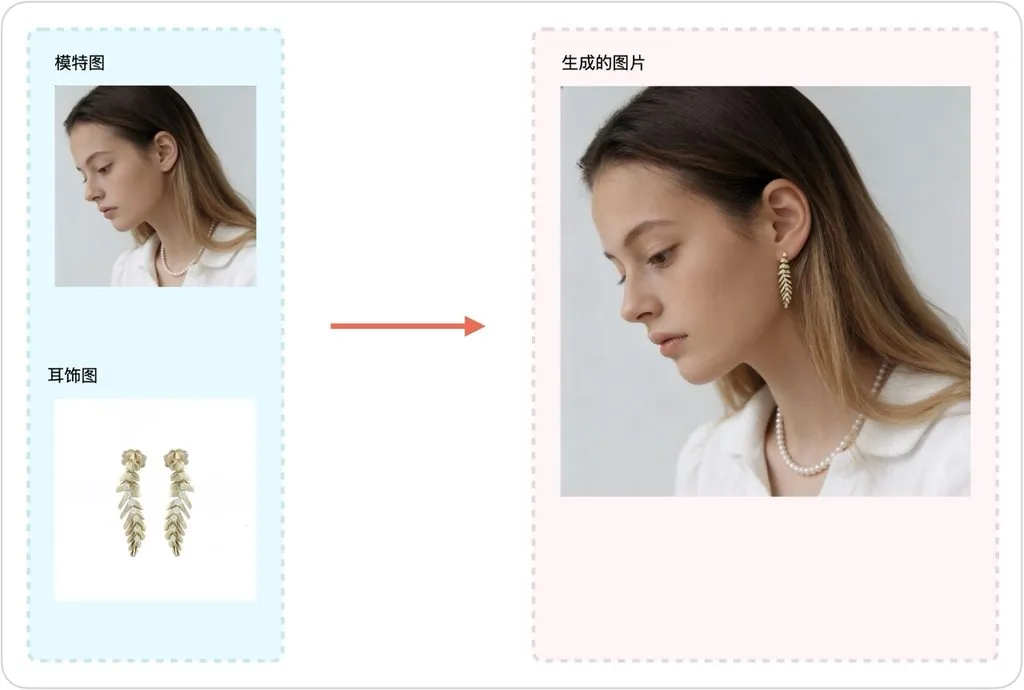
This AI Earrings Try-On tutorial explains how to place earrings, studs, hoops, and short drop earrings naturally onto a model photo. With the AI Earrings Try-On tool, jewelry sellers can quickly create realistic product images for online stores, product detail pages, social media, and advertising.

You will learn how to prepare model and earring images, choose the right type of reference photo, enter an accurate product size, generate the try-on result, and troubleshoot common problems such as incorrect scale or placement.

What Is AI Earrings Try-On?

AI earrings try-on uses a model photo and an earring reference image to create a new image that shows the jewelry being worn. The tool analyzes the visible ear, the product shape, and the size you provide, then positions the earring while preserving the model's appearance and the jewelry's key details.

This workflow is especially useful when you need consistent model photography for multiple products without arranging a separate photo shoot for every earring design.

Which Earrings Work Best?

The tool works best with studs, small earrings, hoops, huggies, ear clips, and short drop earrings. As a practical guideline, the total height of the earring should not be dramatically greater than the visible height of the model's ear. This gives the AI a clearer reference for realistic placement and scale.

Large statement earrings, long chandelier styles, and products with complex chains can also be tested, but the final image should be checked carefully for proportion, hanging direction, attachment point, and symmetry.

How to Choose a Model Photo

Use a sharp, well-lit portrait with natural skin texture. An image width or height of approximately 1,000–2,000 pixels is normally sufficient. At least half of the model's face should be visible, and the ear that will wear the jewelry must be clear and unobstructed.

Avoid photos in which the head is very small, hair covers the ear, or the face is heavily blurred. When the ear is difficult to identify, the AI may place the product too high, too low, or at the wrong angle.
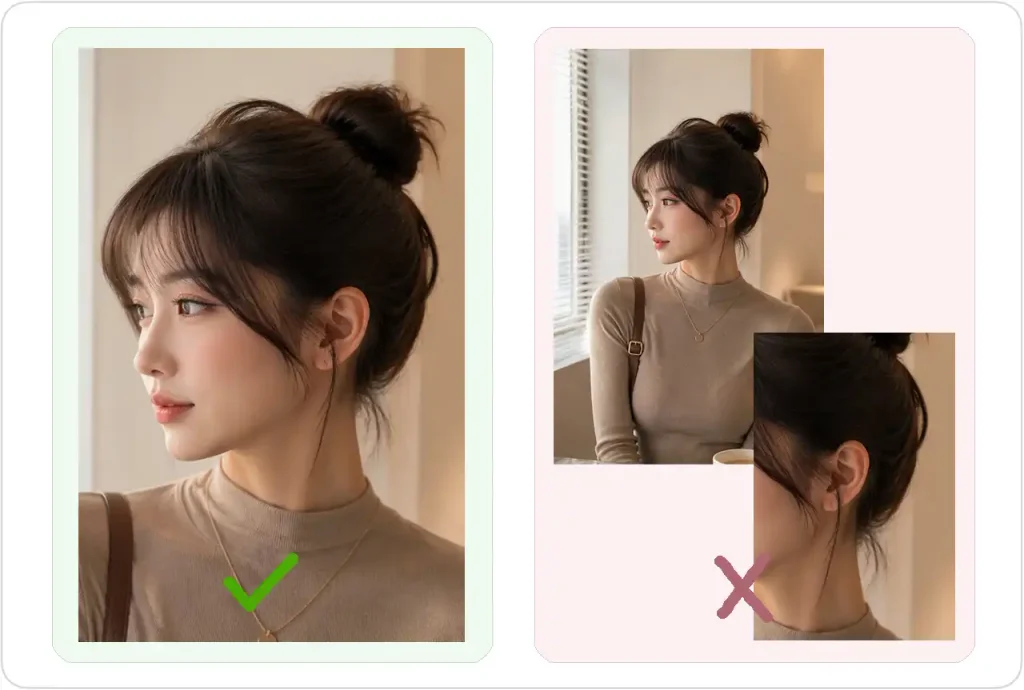
Suitable model photo for AI earrings try-on

Product Photo or Wearing Reference: Which Is Better?

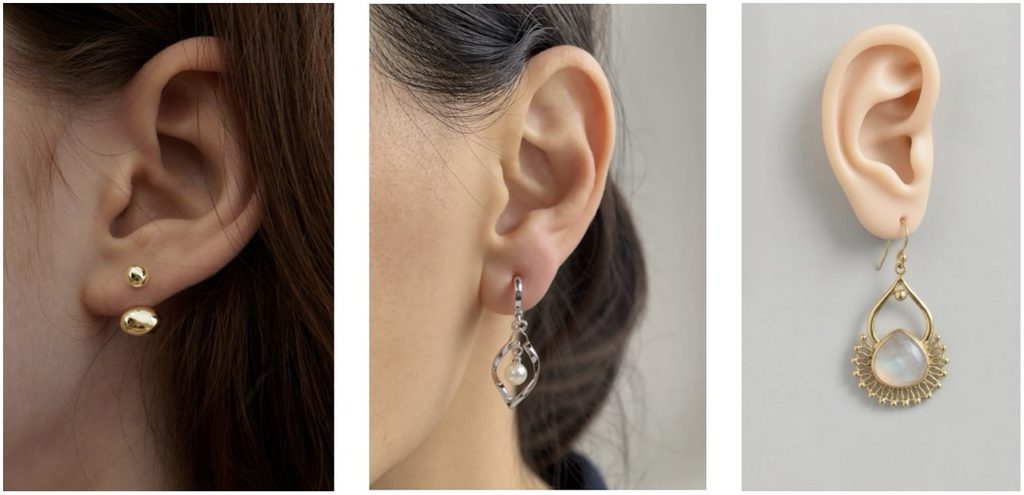
When possible, use a close-up reference image that shows the earring being worn on a real ear.

A clean product photo shows the design clearly, but it does not tell the AI the real-world scale, attachment point, or hanging direction. This is particularly important for hooks, clips, drop earrings, and unusual structures that look different when worn than when placed flat.

A wearing reference helps the tool understand:

  • The actual size of the earring
  • The correct piercing or attachment point
  • The natural hanging direction
  • The proportion between the jewelry and the earlobe
  • The angle of the product when worn
Earring wearing reference image for AI try-on

How to Use the AI Earrings Try-On Tool

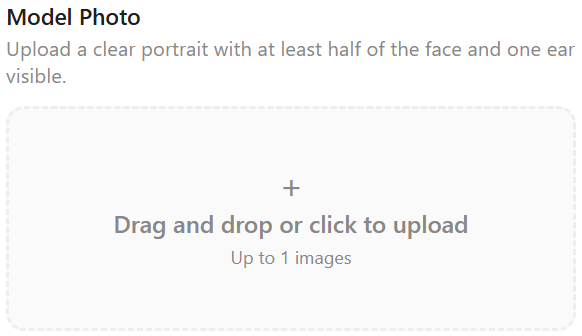
Step 1: Upload a Model Photo

Click the upload area or drag in the model photo. Make sure the face and at least one ear are clearly visible. A front-facing or three-quarter portrait usually produces the most predictable result.
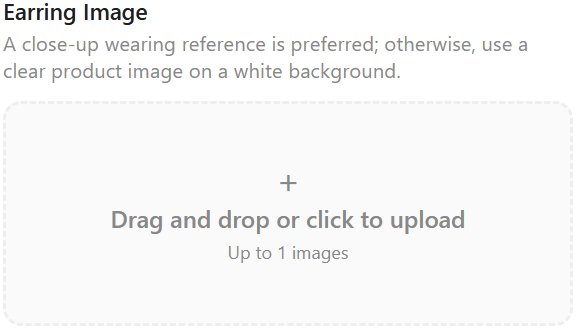
Step 2: Upload the Earring Image

Upload a clear earring image. A close-up wearing reference is recommended because it provides useful scale and placement information. If one is not available, use a sharp product photo with a simple background and an unobstructed view of the entire design.
Step 3: Enter the Earring Size

Enter the length of the earring's longest edge in millimeters. Use the real product measurement whenever possible. Accurate size information helps prevent the generated jewelry from appearing noticeably too large or too small.

Step 4: Generate and Review the Result

Start the generation process and keep the page open until the image is ready. Do not judge the result only by whether it looks attractive. Check the following details before using it commercially:

  • Earring size and proportion
  • Piercing or clip position
  • Left and right orientation
  • Hanging angle and gravity
  • Product shape and symmetry
  • Metal, gemstone, pearl, and surface details

If the jewelry is misplaced or the scale is inaccurate, first verify the size value. Then try a clearer model image or a wearing reference that shows the product's true proportion.

AI Earrings Try-On Examples

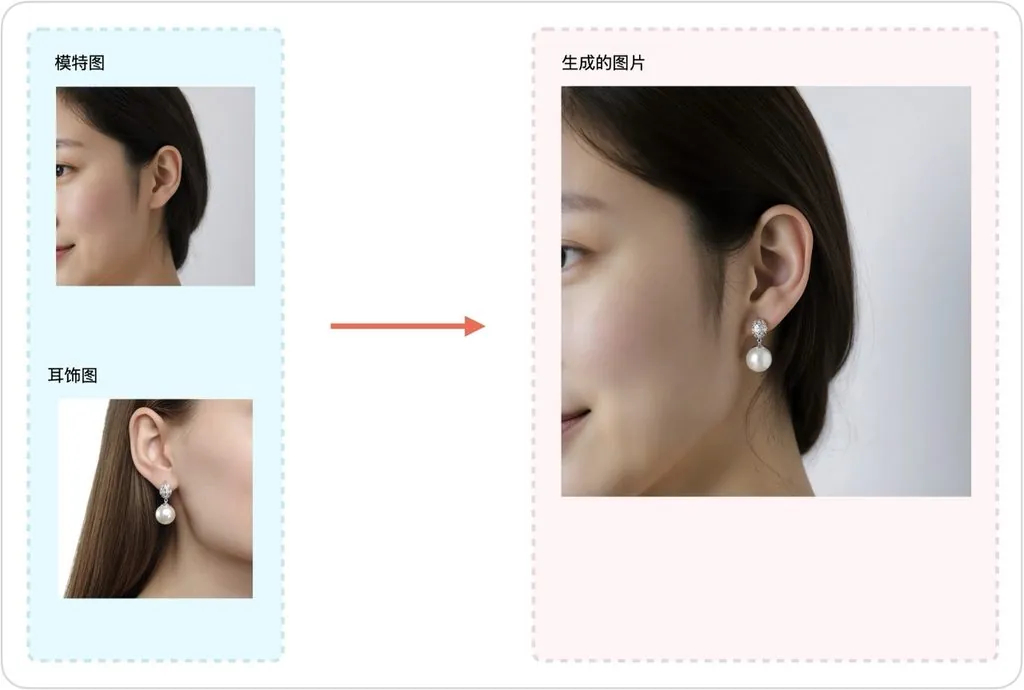
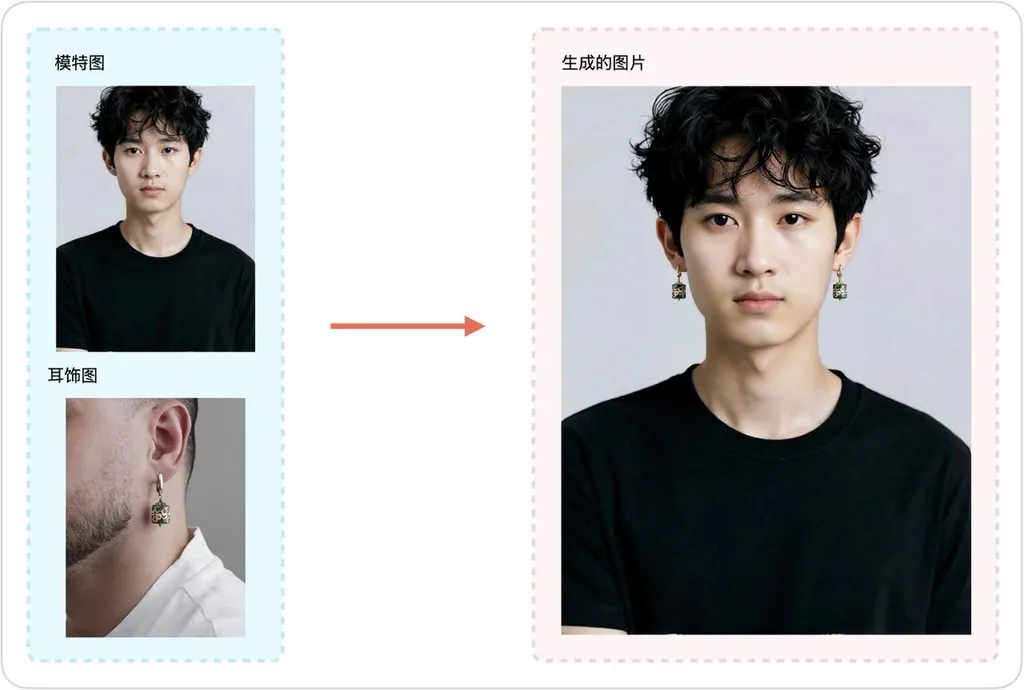
The examples below demonstrate how the tool can place different earrings on a model while maintaining a natural relationship between the jewelry, ear, hair, face, and lighting.
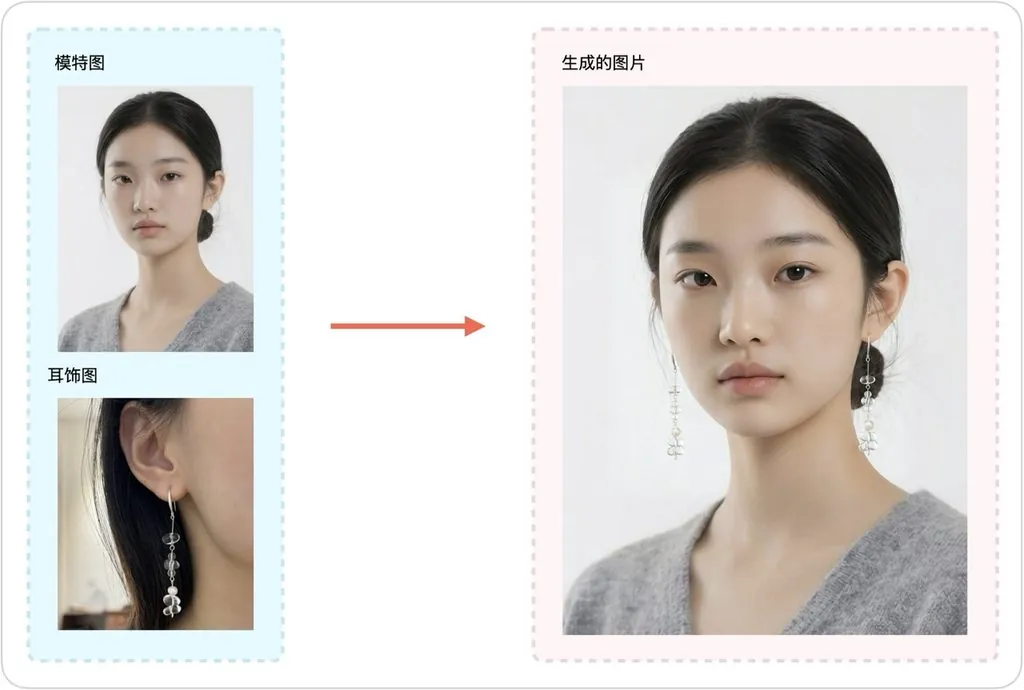
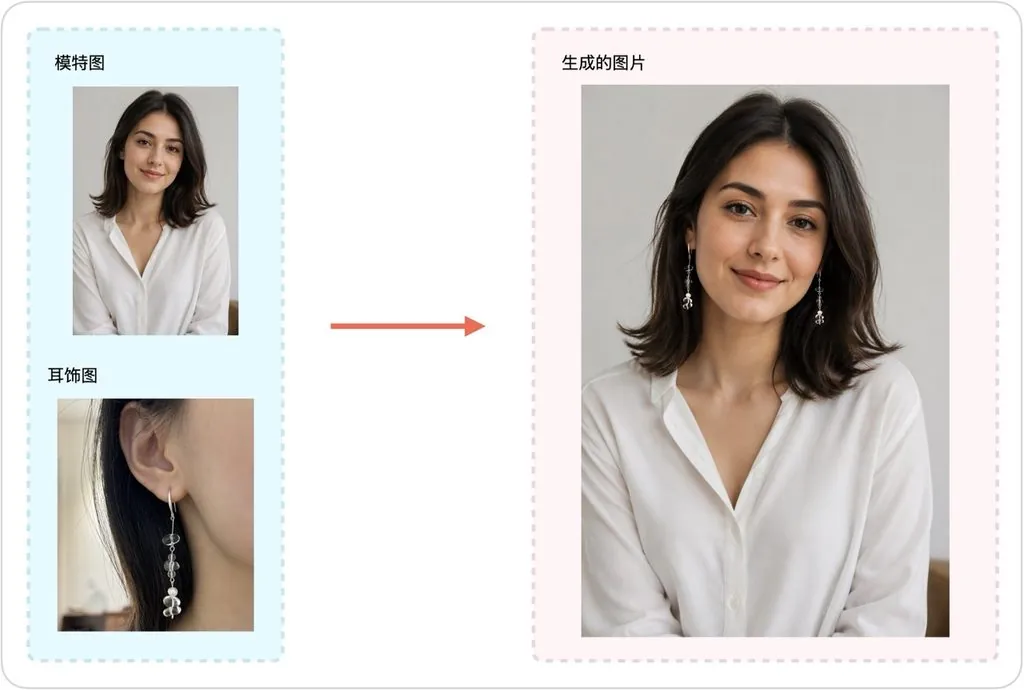
AI earrings try-on result example
AI earrings try-on result with natural placement
AI-generated earring try-on image with realistic scale
AI earrings try-on example with accurate ear placement
Virtual earring try-on result preserving jewelry details
AI earring model image for ecommerce
Realistic AI earrings try-on result

Tips for More Realistic Earring Try-On Images

  • Use sharp source images without motion blur or heavy compression.
  • Choose a model photo where the target ear is fully visible.
  • Enter the actual longest-edge measurement in millimeters.
  • Prefer a real wearing reference for hooks, clips, and drop earrings.
  • Review product shape, stone count, metal color, and left-right orientation before publishing.

Frequently Asked Questions

Can I use a product-only image?

Yes. A clean product image can work well for simple studs and hoops. For earrings with hooks, clips, long drops, or complex structures, a real wearing reference usually gives the AI better information about scale and attachment.

How accurate is the generated earring size?

Accuracy depends on the model photo, the product reference, and the millimeter value you enter. Always compare the result with the product's actual measurements before using the image on a product page.

Why is the earring placed incorrectly?

Common causes include hair covering the ear, a low-resolution portrait, an unclear attachment point, or an inaccurate size value. Replace the weakest source image and generate again.

Create Your AI Earrings Try-On Image

An effective AI earrings try-on workflow starts with a visible ear, a clear jewelry reference, and an accurate product measurement. Prepare those three inputs carefully, review the generated scale and details, and the tool can help you create useful e-commerce visuals much faster.
Start using the AI Earrings Try-On tool

AI Jewelry Try-On Tutorial V2: Multiple Accessories

AI Jewelry Try-On V2 is designed for creating realistic on-model jewelry images, with improved support for mini earrings, studs, ear cuffs, and multiple accessories worn together. In this AI Jewelry Try-On Tutorial, you’ll learn how to prepare jewelry images, use multiple accessory inputs correctly, and create more natural try-on results with better scale, placement, and proportions.

This tutorial explains the key rule of the v2 workflow: uploading multiple jewelry images does not activate batch mode. Instead, the tool treats those images as multiple jewelry items that should be worn together in one final try-on result.

How Does AI Jewelry Try-On V2 Work?

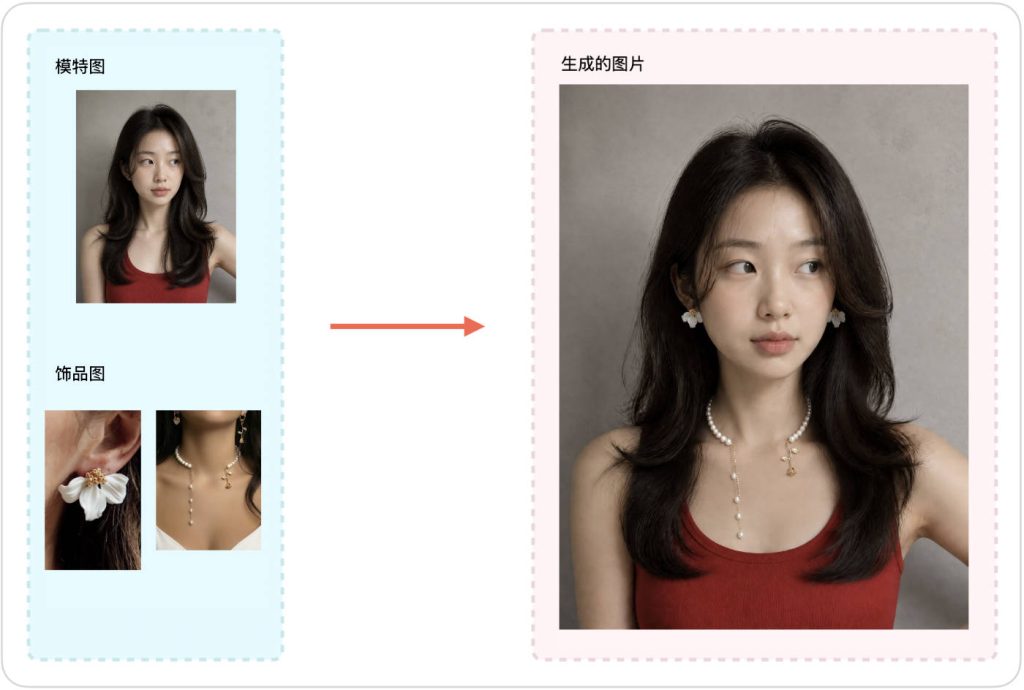
In Jewelry AI Try-On Tool v2, you can upload more than one jewelry image. However, this is not the same as batch generation. The system will not treat each uploaded jewelry image as a separate task. Instead, it will try to place multiple jewelry items on the model in the same image.

For example, if you upload several small earring images, the AI will understand them as accessories that should appear together on the person. This makes the v2 tool helpful when you want to create a coordinated jewelry look, a multi-piece accessory set, or a realistic try-on image that shows more than one item.

If your goal is to generate separate results for different jewelry products, upload and generate them one by one. If your goal is to show multiple accessories worn together, upload the related jewelry images in the same task.

Examples

Why AI Jewelry Try-On V2 Works Better for Mini Earrings

One important advantage of the v2 jewelry AI try-on tool is that it can create better results for very small earrings and delicate ear accessories. Mini earrings are difficult for AI tools because they are small, precise, and easy to lose during generation. Earlier try-on workflows may enlarge the earring too much, blur the shape, or place it in an unnatural position.

The v2 workflow is better suited for subtle jewelry placement. It can help create more natural wearing effects for small studs, tiny hoops, minimal earrings, ear cuffs, and delicate decorative pieces. This is useful for e-commerce sellers who need realistic product visuals for small jewelry styles.

What do I need to prepare before using it?

  • Person image: It is recommended to use a photo with clear visuals, natural lighting, and no obstructions in the wearing area. For earring effects, the person's ears should be clearly visible.
  • Product image: For earrings and necklaces, it is best to use a wearing image whenever possible, as this helps capture the correct scale between the product and the human body. If no model is available, a mannequin can be used as a substitute.

Jewelry Try-On V2 – Steps for Use

Step 1: Upload a person image
Upload the photo of the person to whom you want to add jewelry. Images that are clear, evenly lit, and show the wearing area clearly will help the tool better determine the placement, size, and angle of the jewelry.

Step 2: Upload one or more product images
Upload the product images of the jewelry you wish to try on. You may upload just one image, or multiple product images at the same time.

Note: Uploading multiple product images does not activate batch mode. V2 will attempt to place all of these jewelry items on the same person in a single result, rather than generating separate results for each product image individually.

Step 3: Generate and review the result
Submit the images and begin generation. After completion, carefully check the placement, size and proportion, edge blending, and detail naturalness of the jewelry. If the result is not satisfactory, try using clearer source images, or reduce the number of jewelry items uploaded at the same time before retrying.

Best Use Cases for Jewelry AI Try-On Tool v2

  • Generating realistic try-on images for mini earrings and small ear jewelry.
  • Showing multiple jewelry items worn together in one coordinated look.
  • Creating e-commerce product visuals for earrings, ear cuffs, studs, and subtle accessories.
  • Testing how different jewelry pieces look on a real person before creating final product images.
  • Producing social media visuals, product page drafts, and advertising image concepts.

Tips for Better AI Jewelry Try-On Results

  • Use clear jewelry images with a clean background whenever possible.
  • For mini earrings, make sure the earring shape is visible and not too blurry.
  • Upload multiple jewelry images only when you want them to appear together in one try-on image.
  • If you want separate try-on results for different products, generate them in separate tasks.
  • Review the wearing position carefully, especially for earrings, ear cuffs, and small accessories.

How to Keep the Correct Jewelry Size and Proportions

For mini earrings and other delicate jewelry, product scale is especially important. When possible, use a reference image that provides a clear size reference, such as an ear, neck, finger, or wrist. This helps the AI better understand the expected jewelry dimensions and placement.

For very small earrings, studs, and ear cuffs, a clear close-up reference generally produces more reliable proportions than an isolated white-background jewelry image.

Conclusion

Jewelry AI Try-On Tool v2 is best understood as a tool for realistic jewelry wearing effects, not as a batch generator. When you upload multiple jewelry images, the AI tries to place those items together in the same result. This makes it useful for coordinated jewelry looks and multi-accessory try-on images.

The biggest improvement of v2 is its support for smaller, more delicate earrings. If you need AI-generated try-on images for mini earrings, ear cuffs, subtle studs, or small jewelry pieces, this version can provide more natural placement and better visual control.

FAQ

What is AI Jewelry Try-On V2?

AI Jewelry Try-On V2 creates realistic jewelry-wearing images from product and model photos, with improved support for mini earrings, delicate ear jewelry, and multiple accessories worn together.

Is AI Jewelry Try-On V2 better for small earrings?

Yes. V2 is optimized for smaller and more delicate jewelry such as studs, tiny hoops, ear cuffs, and subtle earrings, where accurate placement and proportions are especially important.

Can I try on multiple jewelry pieces at the same time?

Yes. When multiple jewelry images are uploaded in V2, the AI treats them as accessories that should be worn together in the same image rather than as separate batch-generation tasks.

Does uploading multiple jewelry images create batch results?

No. Multiple jewelry images are combined into one try-on result. If you want separate results for different products, generate each jewelry item in a separate task.

How can I keep earrings at the correct size?

Use clear product images and, when possible, provide a wearing reference that shows an ear or another recognizable size reference. This helps the AI better understand the expected size, position, and proportions of the jewelry.

What types of jewelry work with AI Jewelry Try-On V2?

V2 works especially well for earrings, studs, tiny hoops, ear cuffs, and other delicate accessories, and it can also be used to create coordinated looks with multiple jewelry pieces.

Try it here: Jewelry AI Try-On Tool v2.

AI Jewelry Try-On Set Tutorial: 4 Consistent Wear Images

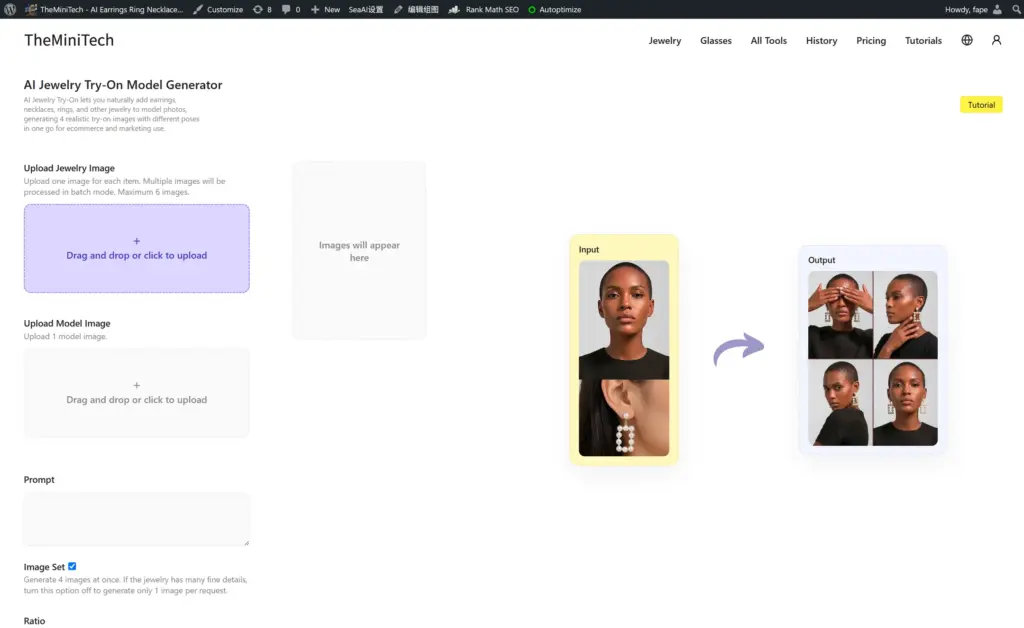
The AI Jewelry Try-On Model Generator places earrings, necklaces, rings, and other jewelry products naturally onto a model photo. When Set mode is enabled, it generates four consistent wear images with different angles and views, making it useful for product listings, ecommerce pages, ads, and social media.

This AI Jewelry Try-On Set Tutorial explains how to prepare product and model images, enable Set mode to generate four consistent try-on images, and choose the right workflow for complex jewelry or multiple products.

AI Jewelry Try-On interface for generating four consistent wear images

When Should You Use AI Jewelry Try-On Set Mode?

Set mode is ideal when you need a small collection of consistent jewelry try-on images quickly. It creates four results around the same model and product with different angles or views, so you can use them together on product pages, social posts, and ad creatives.

If you need the highest possible resolution, product accuracy, or close inspection of a complex piece of jewelry, turn Set mode off and generate one image first. Single-image mode is often better for detailed stones, chains, settings, metal textures, and other fine features.

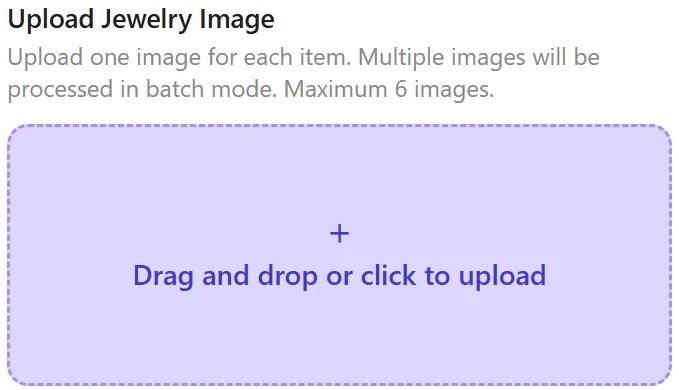
Step 1: Upload Your Jewelry Product Image

Upload a jewelry product image in the AI Jewelry Try-On tool

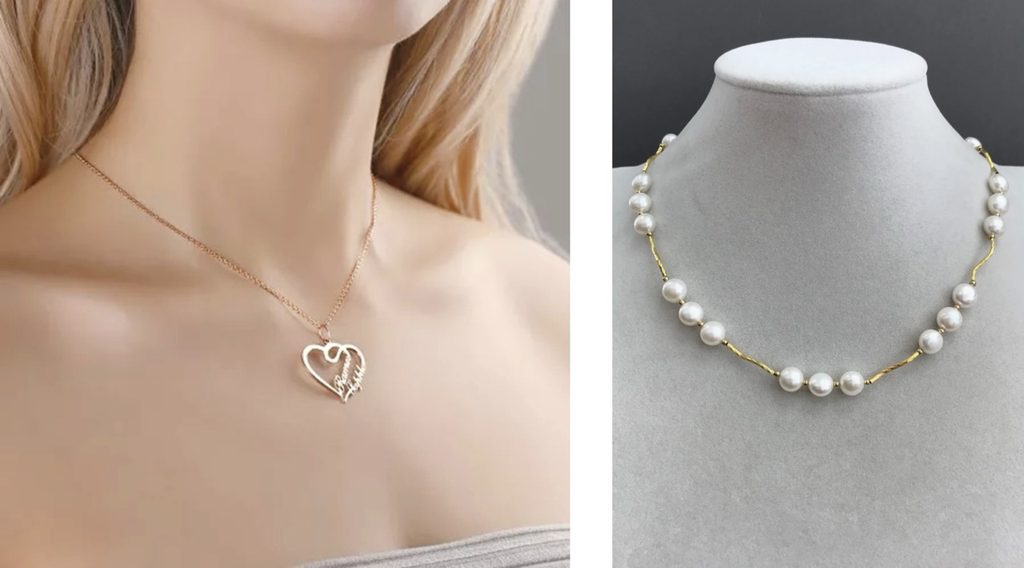
Upload the jewelry product you want to place on the model. Click the plus icon or drag the image into the upload area. Worn or hand-held product images usually give the AI a better sense of scale; with a plain white-background product image, the final proportion may look less natural.

Use a clear, complete JPG or PNG product image. A source image with a long edge of about 1,000 to 2,000 pixels is generally enough for the AI to recognize the jewelry's shape, material, and details.

Does Uploading Multiple Product Images Activate Batch Mode?

Yes. With one product image, the tool combines that jewelry with the model image. Uploading multiple product images automatically activates batch mode, which pairs each product with the same model image in sequence: Product 1 plus the model, Product 2 plus the model, Product 3 plus the model, and so on.

Batch mode processes multiple products. Set mode controls whether each product produces four different views or one single image. The two options can work together, but they solve different production needs.

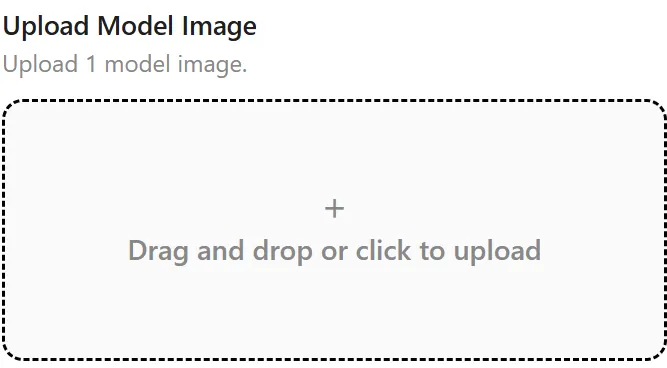
Step 2: Upload a Person or Model Image

Upload a model image in the AI Jewelry Try-On tool

Choose a clear model image with natural lighting and no obstruction over the wearing area. The person does not have to be shown from the face; a close-up or partial image can also work. Images in which the person is already wearing jewelry can be used as well.

  • For earrings, the ears should be clearly visible.
  • For necklaces, keep the neck and upper chest area visible.
  • For rings, make sure the hand and fingers are clearly visible.

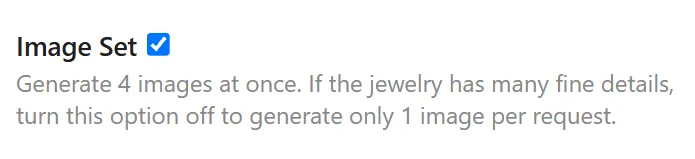
Step 3: Enable Set Mode to Generate 4 Consistent Wear Images

Set mode option in the AI Jewelry Try-On tool

When the Set mode option is enabled, the tool automatically generates four jewelry wear images from different angles or views. This is the core workflow in an AI Jewelry Try-On Set Tutorial: quickly creating a visually consistent image set around the same model, product, and overall style.

When Set mode is disabled, the tool generates one image from the model's current angle. Single-image mode usually offers higher resolution and accuracy, so it is the better choice when you need to inspect fine details such as gemstone settings, chains, metal textures, or intricate craftsmanship.

Step 4: Generate and Review the Results

After uploading the images and choosing a mode, start generation. Review the jewelry structure, gemstone and metal details, placement, scale, and edge blending when the results are ready.

If the jewelry is distorted, out of proportion, or positioned unnaturally, replace the product or model image with a clearer source and test single-image mode first. Once the single result is stable, use Set mode or batch mode to create more images.

Tips for Better AI Jewelry Try-On Image Sets

  • Use a clear product image with the complete jewelry piece visible and unobstructed.
  • Enable Set mode when you need four consistent wear images.
  • For complex or delicate jewelry, turn Set mode off and test one single image first.
  • Prepare a model image with the relevant wearing area visible: ears, neck, upper chest, hands, or fingers.
  • Before processing a batch, test one product image to confirm that the model image, scale, and placement work well.

Frequently Asked Questions

What is the difference between Set mode and batch mode?

Set mode creates four different views from the same inputs. Batch mode processes multiple jewelry product images, pairing each one with the same model image. Set mode answers how many images you need for each product; batch mode answers how many products you need to process.

Should I enable Set mode for complex jewelry?

For detailed jewelry with fine settings, gemstones, chains, or intricate metal textures, begin with Set mode off and generate one image. Single-image mode usually preserves fine details more accurately. Enable Set mode after confirming the result.

Does the model image need to show a face?

No. The relevant wearing area is what matters: visible ears for earrings, a visible neck and upper chest for necklaces, or a clear hand and fingers for rings.

Summary

To create a consistent AI jewelry try-on image set, upload a clear product image and a suitable model image, then enable Set mode to generate four views in one run. For intricate jewelry, begin in single-image mode to verify the fine details and scale; for multiple simple products, combine batch mode with Set mode to work more efficiently.

Open the AI Jewelry Try-On Model Generator to create your first jewelry try-on image set.

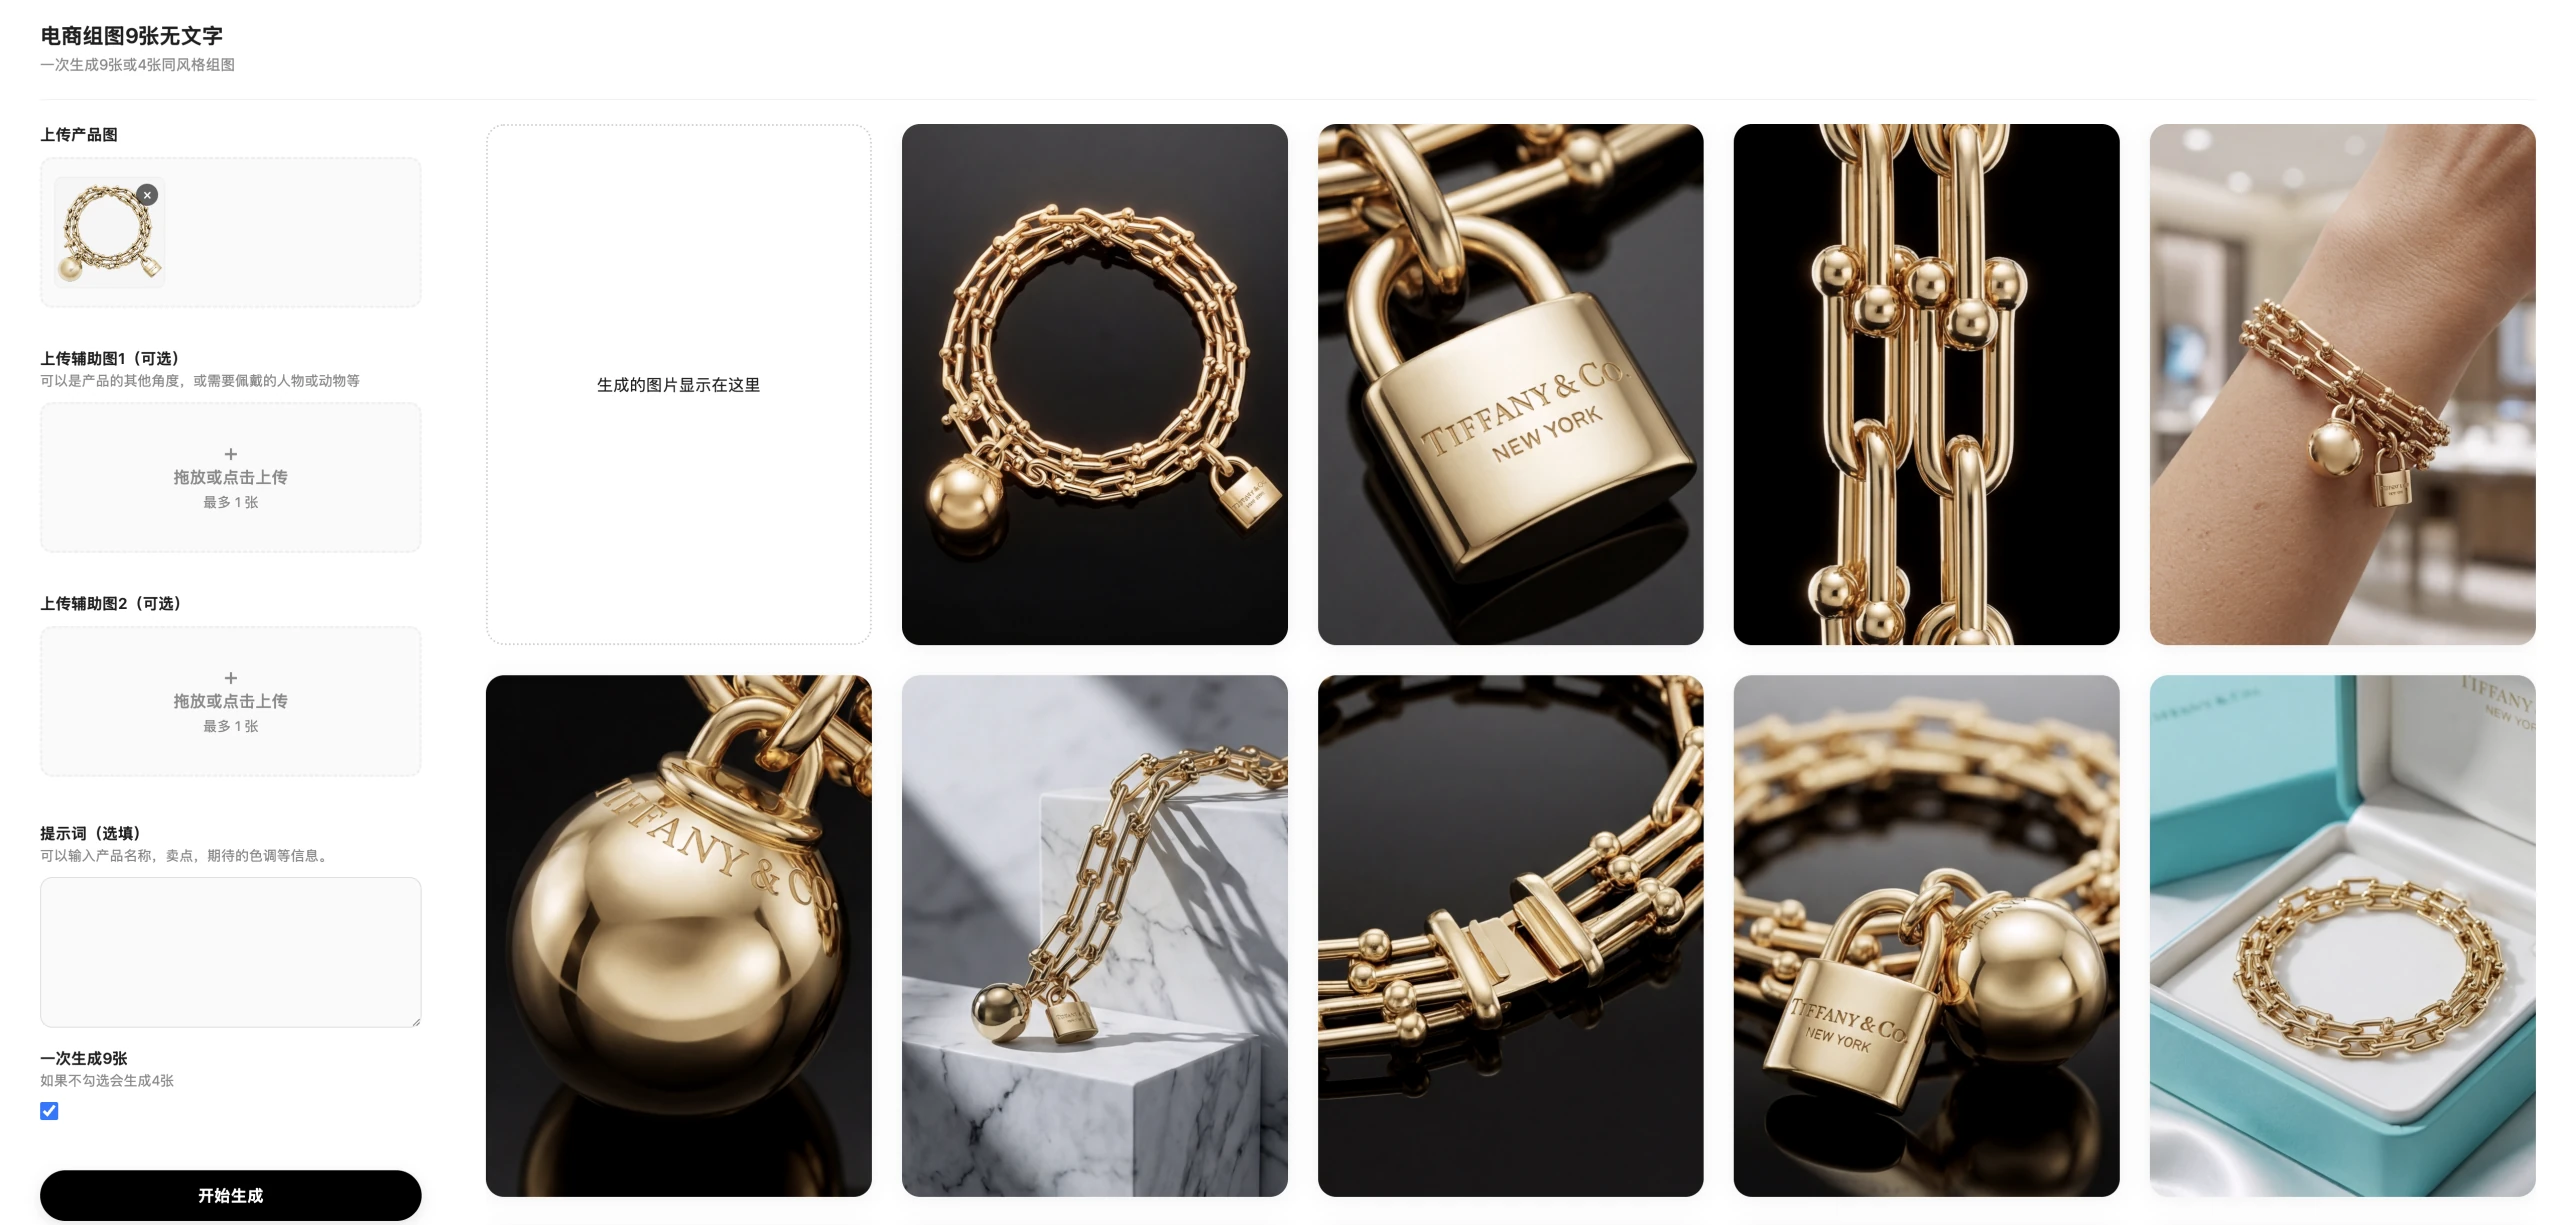
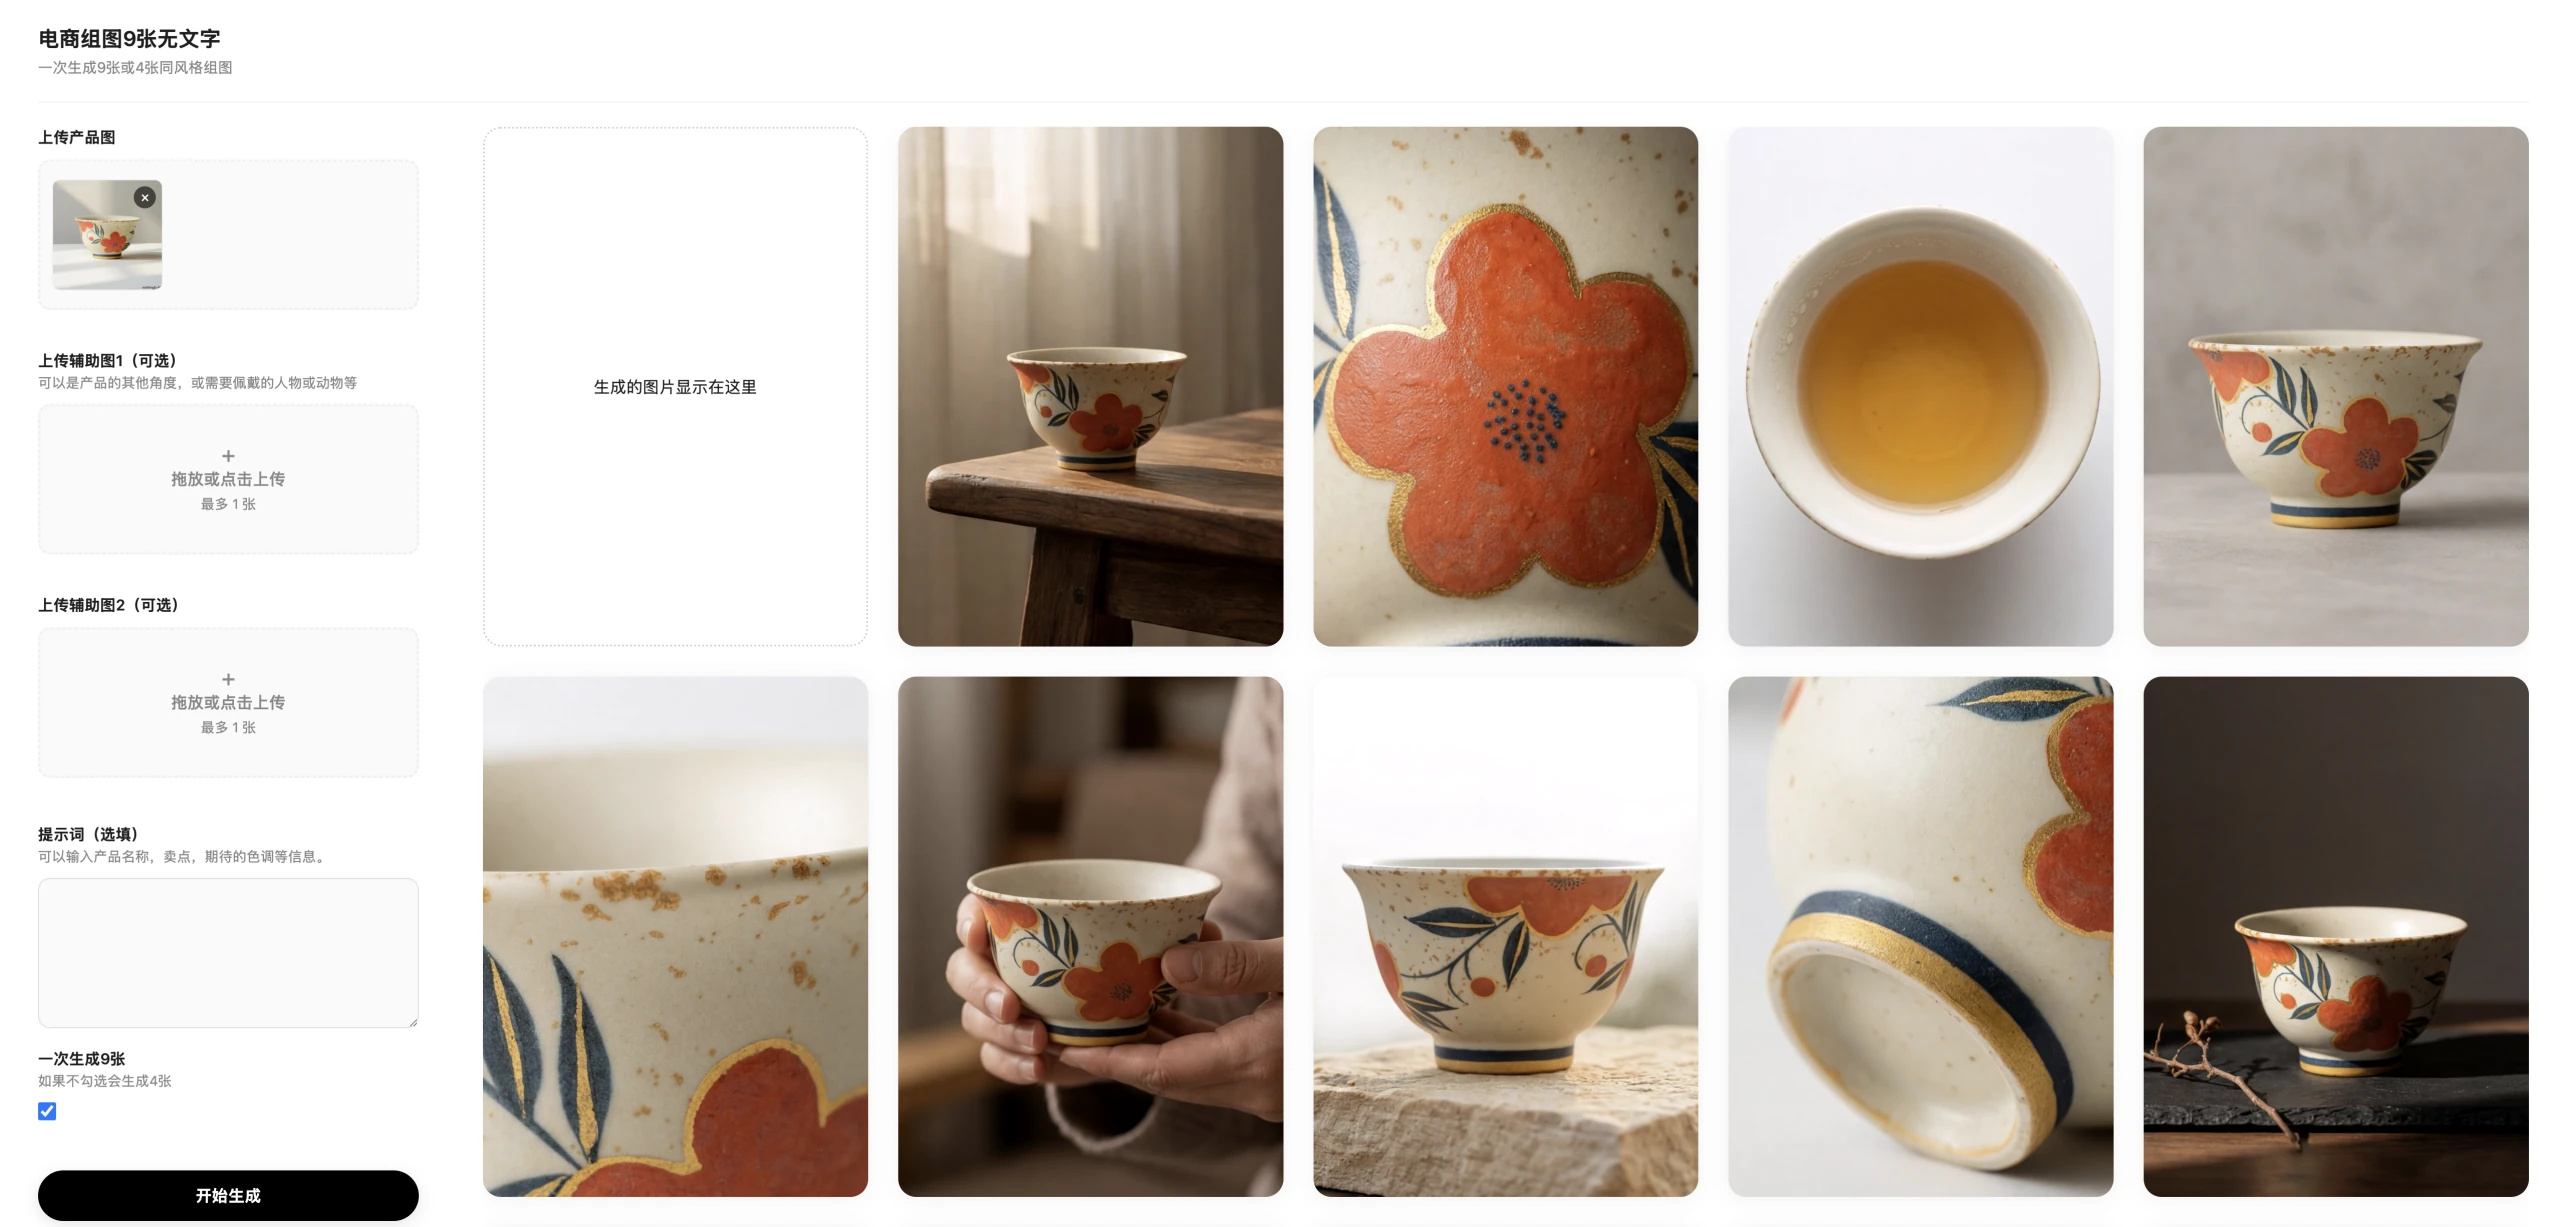
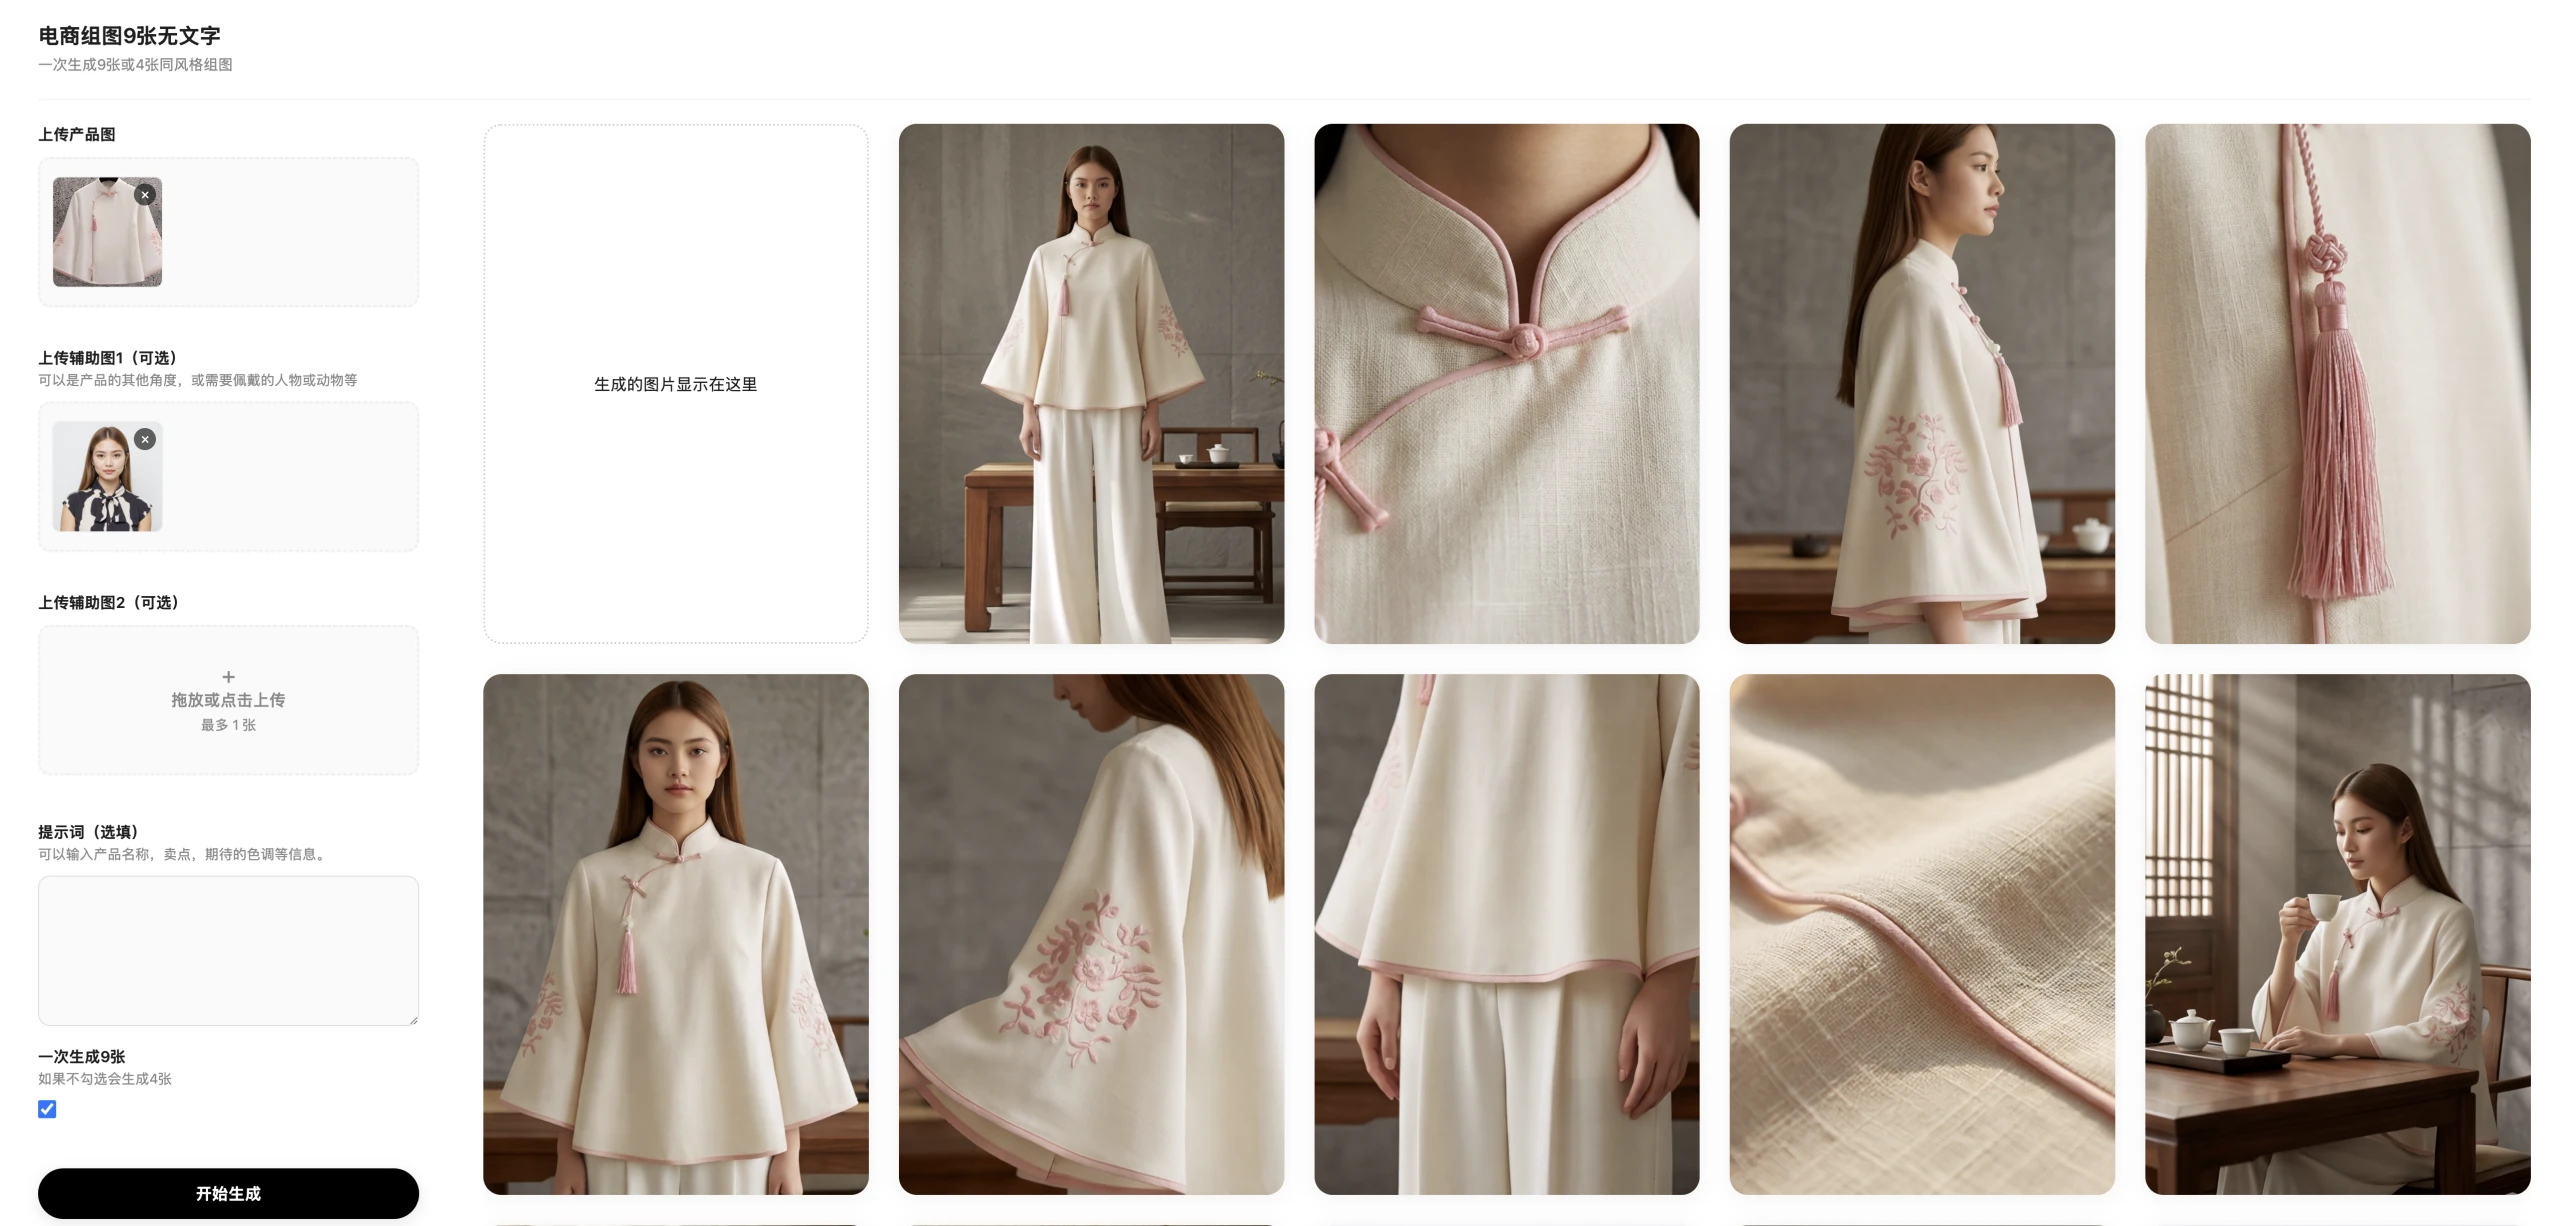
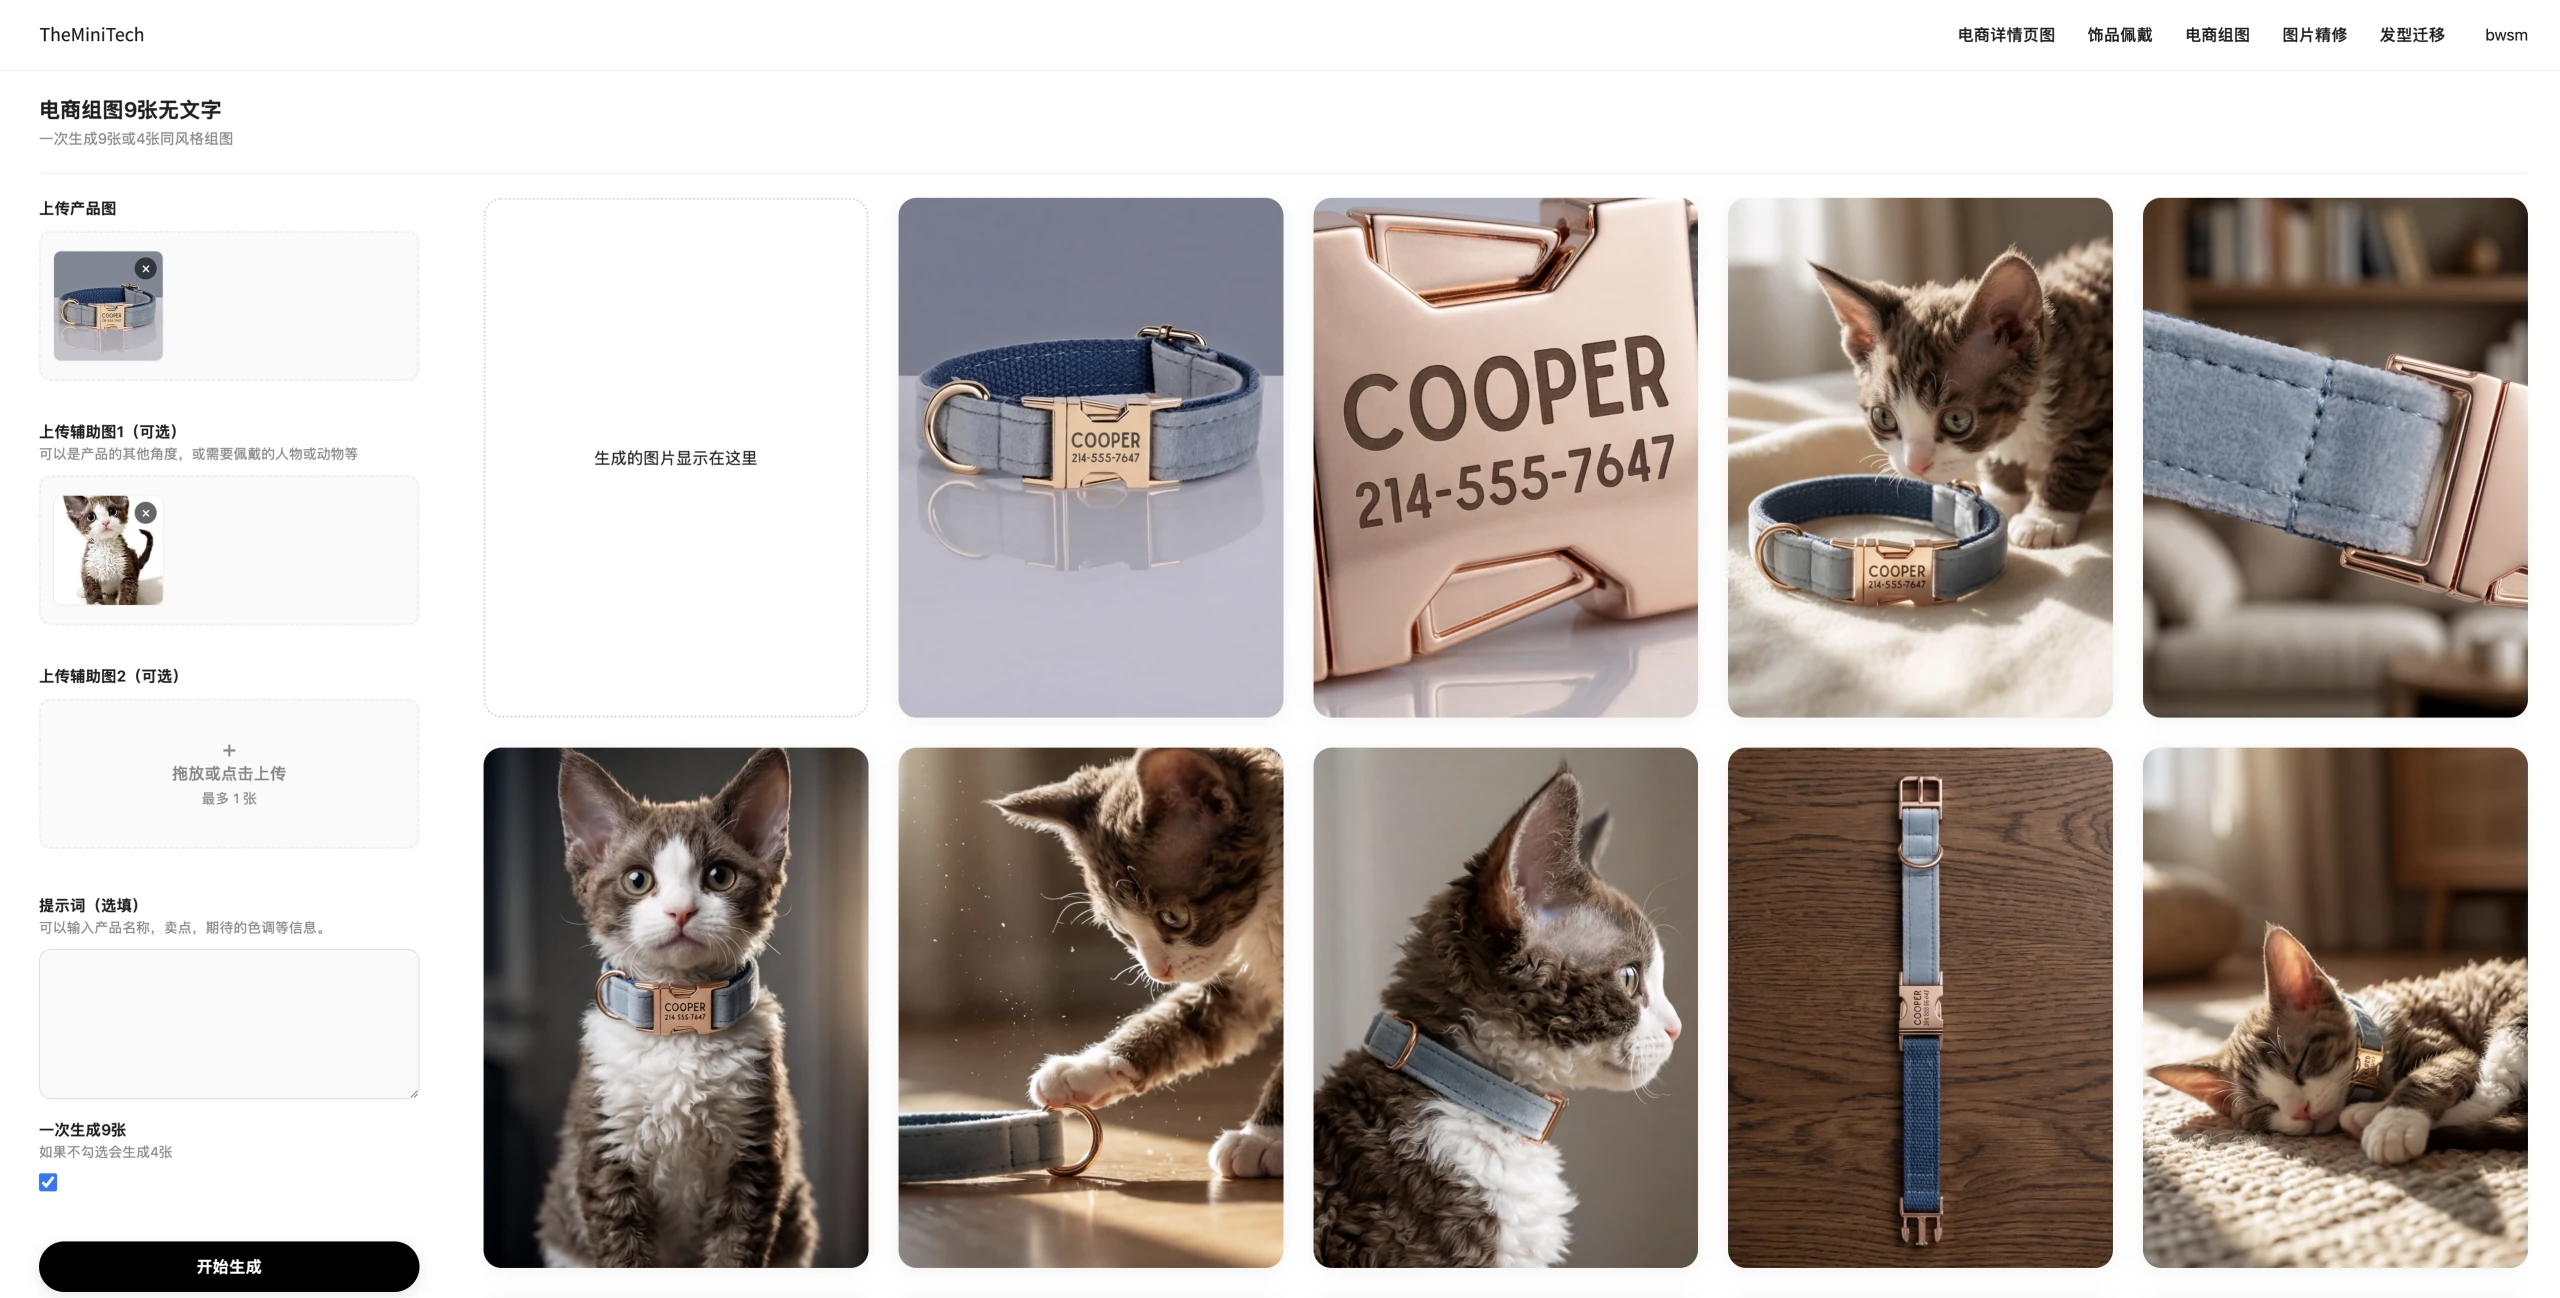
AI Product Image Set Tutorial: Create 9 Ecommerce Product Images

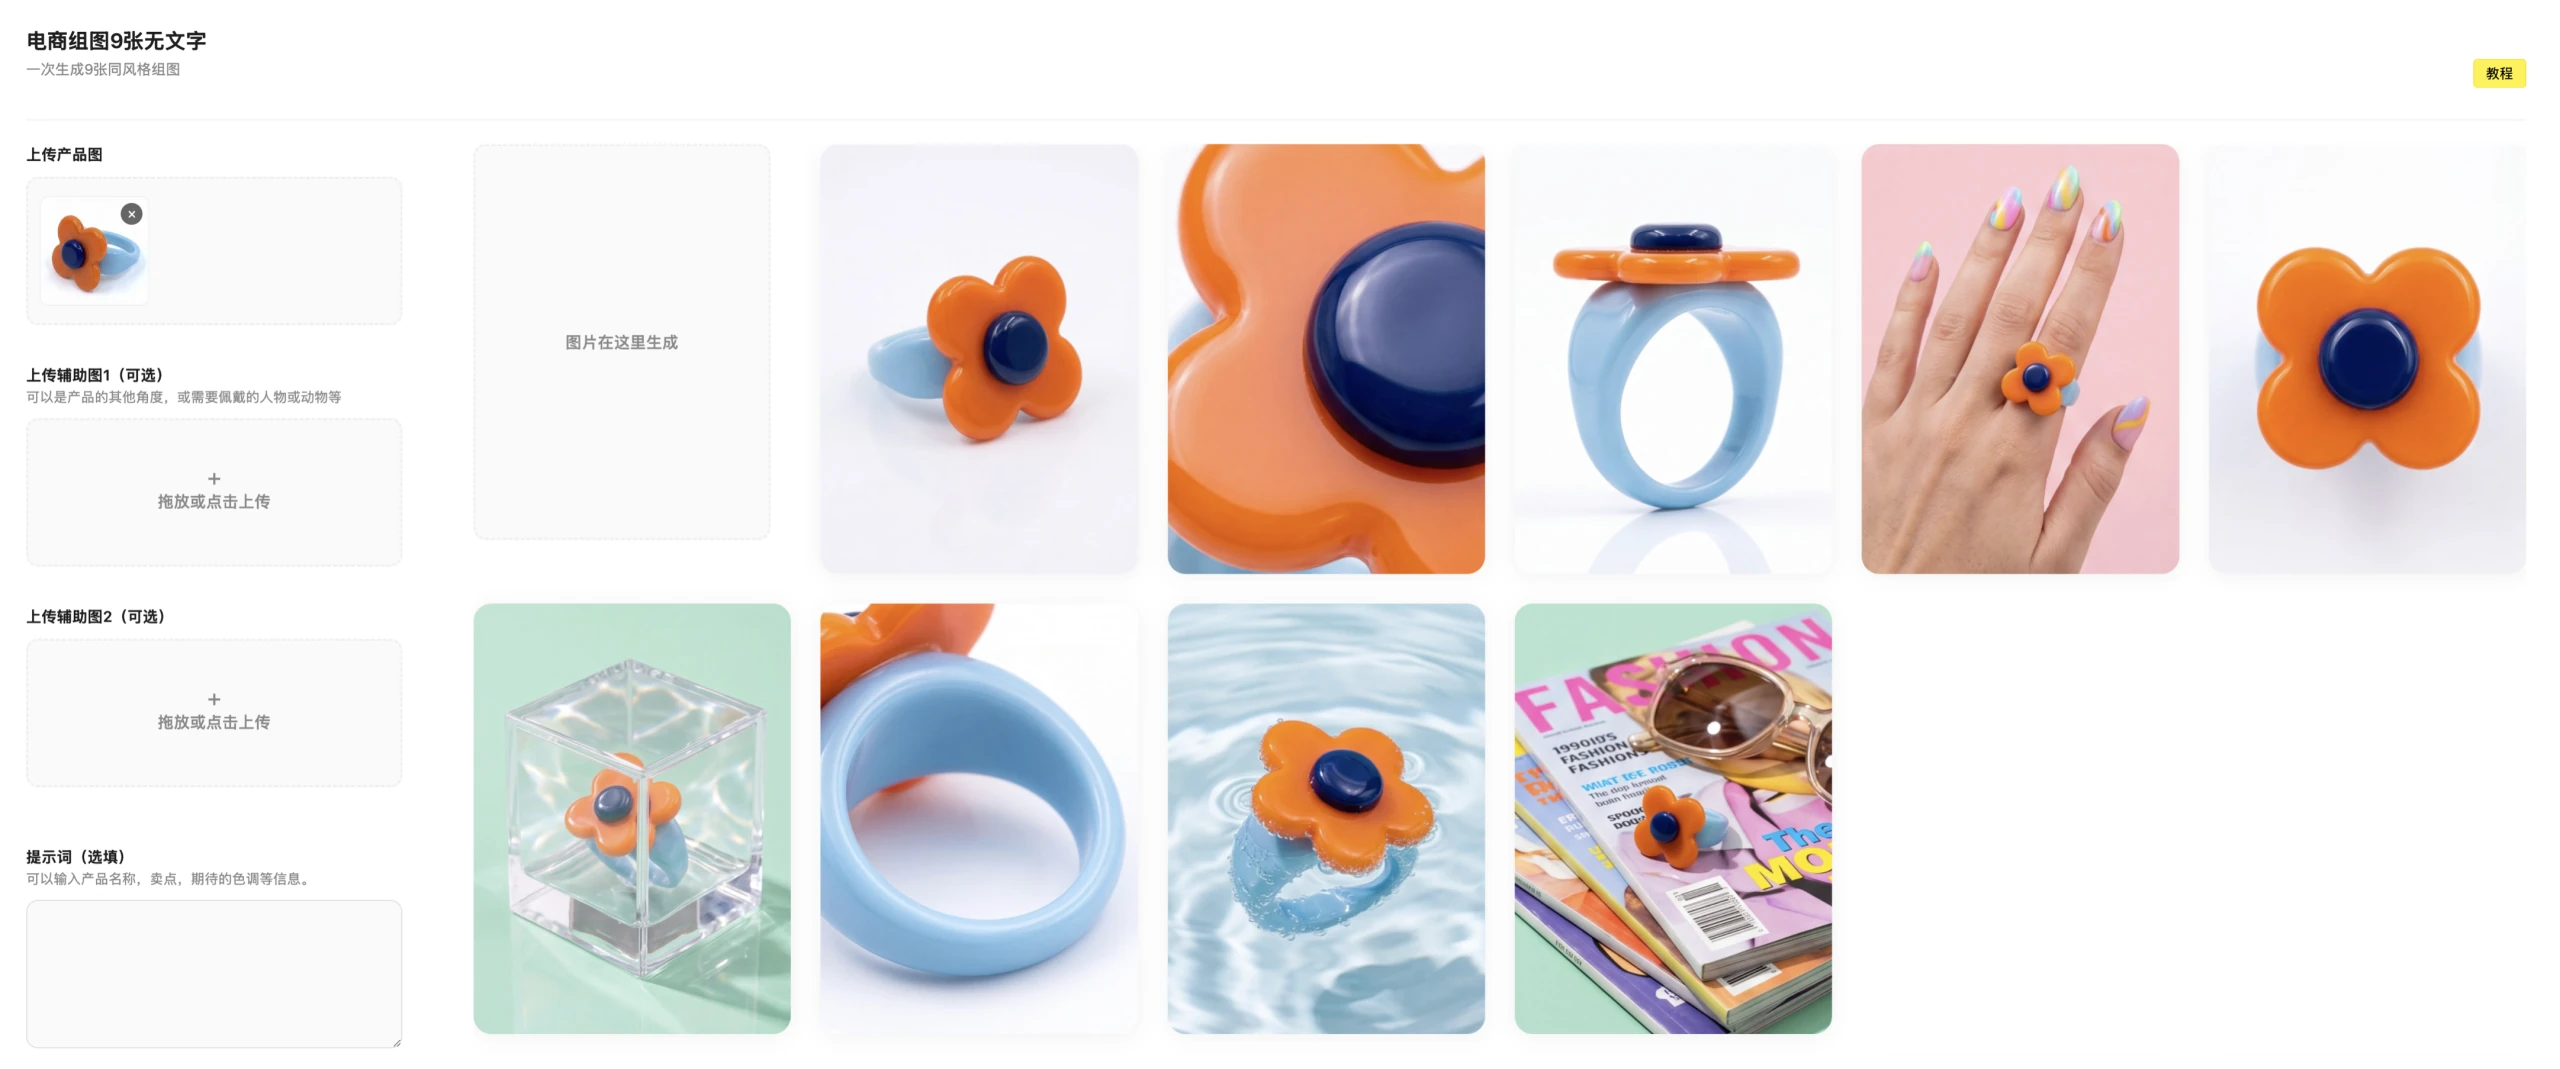
This tutorial explains how to use the AI product image set. It focuses on which product image must be uploaded, when to add optional reference images, and how to prepare better inputs for more consistent AI product visuals.

If you want to quickly create a complete set of clean product display images without embedded text, start with one clear main product photo. Then, depending on the complexity of the product, you can add detail shots, lifestyle images, packaging photos, or images from different angles. These additional references help the AI understand the product more accurately and generate a more stable, unified e-commerce image set.

AI 9-piece e-commerce image set generator upload interface

The First Image Is the Required Main Product Photo

The first image is the core input for the entire generation task, so it must be uploaded. The AI will use this image as the primary reference for identifying the product, including its shape, color, material, structure, and key visual features. For best results, choose a front-facing product image or a main visual that clearly represents the item.

The main product image does not have to be shot in a professional photography studio, but it should meet three basic requirements: the product should be clear, the edges should be complete, and the background should have minimal distractions. If the image is too dark, too blurry, heavily cropped, or only shows part of the product, the generated results are more likely to include deformation, missing details, or incorrect product recognition.

For e-commerce use, the first image should communicate the product as directly as possible. A clean product-on-background photo usually works better than a busy lifestyle image when the goal is to generate a consistent set of product display visuals.

Example of uploading the required main product image
Example of adding optional reference images for product generation

The Second and Third Images Are Optional Reference Images

The second and third images can be used as supplementary inputs, but they are not required. Their purpose is to help the AI understand product information that is not fully visible in the main image. For example, these reference images can show a model wearing or using the product, a pet using the product, the side or back view, detailed structure, packaging, material texture, accessories, or a real usage scene.

If your product has a simple appearance and the main image is already clear enough, uploading only the first image is usually sufficient. However, if the product includes multiple accessories, has several important viewing angles, or contains details that affect purchase decisions, it is better to upload the second and third reference images as well.

Good reference images should provide new information. Avoid uploading several nearly identical photos from the same angle, because repeated inputs do not help the AI understand the product better. Instead, use the optional images to show details that the main product photo cannot explain on its own.
Product reference images and detail image examples
AI-generated e-commerce product image set result example

How to Improve the Quality of a 9-Piece Product Image Set

  • Choose a clear, complete, centered product photo as the main image.
  • Avoid images with large text, watermarks, heavy filters, or complex distracting backgrounds.
  • Use optional reference images to provide new information, not repeated views of the same angle.
  • If the product includes accessories, show the complete accessory set in the main image or reference images.
  • Keep the product color and version consistent across all uploaded images to prevent AI confusion.
  • Use well-lit images whenever possible, because clear inputs usually lead to more accurate product generation.

Best Use Cases for AI E-commerce Product Images

An AI 9-piece e-commerce image set is especially useful for sellers who need multiple product visuals for online stores, marketplaces, landing pages, ads, and social media campaigns. Instead of creating every scene manually, you can use one main product image and a few helpful references to generate a broader visual set quickly.

Because this tool creates images without text, the results are flexible. You can use them as clean product display images, add your own localized marketing copy later, or adapt them for different platforms without worrying about incorrect text appearing inside the image.

Conclusion

The key to generating a high-quality AI 9-piece e-commerce image set is the quality of your image inputs. The first image is required and should be the clearest main product photo. The second and third images are optional references that can be added when the product has important details, multiple angles, accessories, packaging, or usage scenarios.

For most e-commerce products, one strong main product image plus one or two useful reference images can produce more stable, accurate, and visually consistent AI-generated product photos. By preparing your inputs carefully, you can create cleaner product visuals that are better suited for online shopping experiences.

Try it here: AI product image set tool.

AI Jewelry Lifestyle Photo Tool: Step-by-Step Tutorial

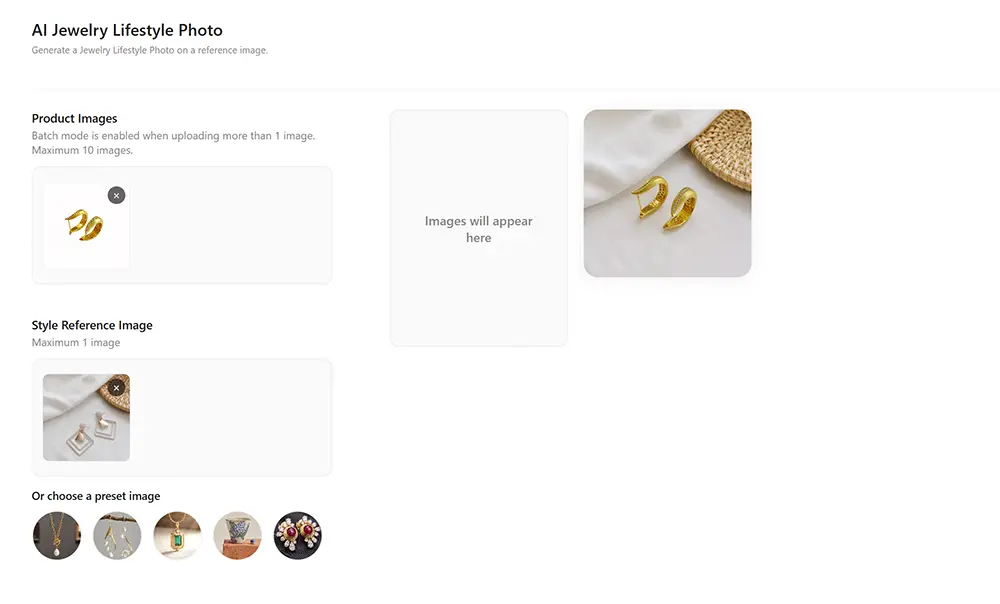
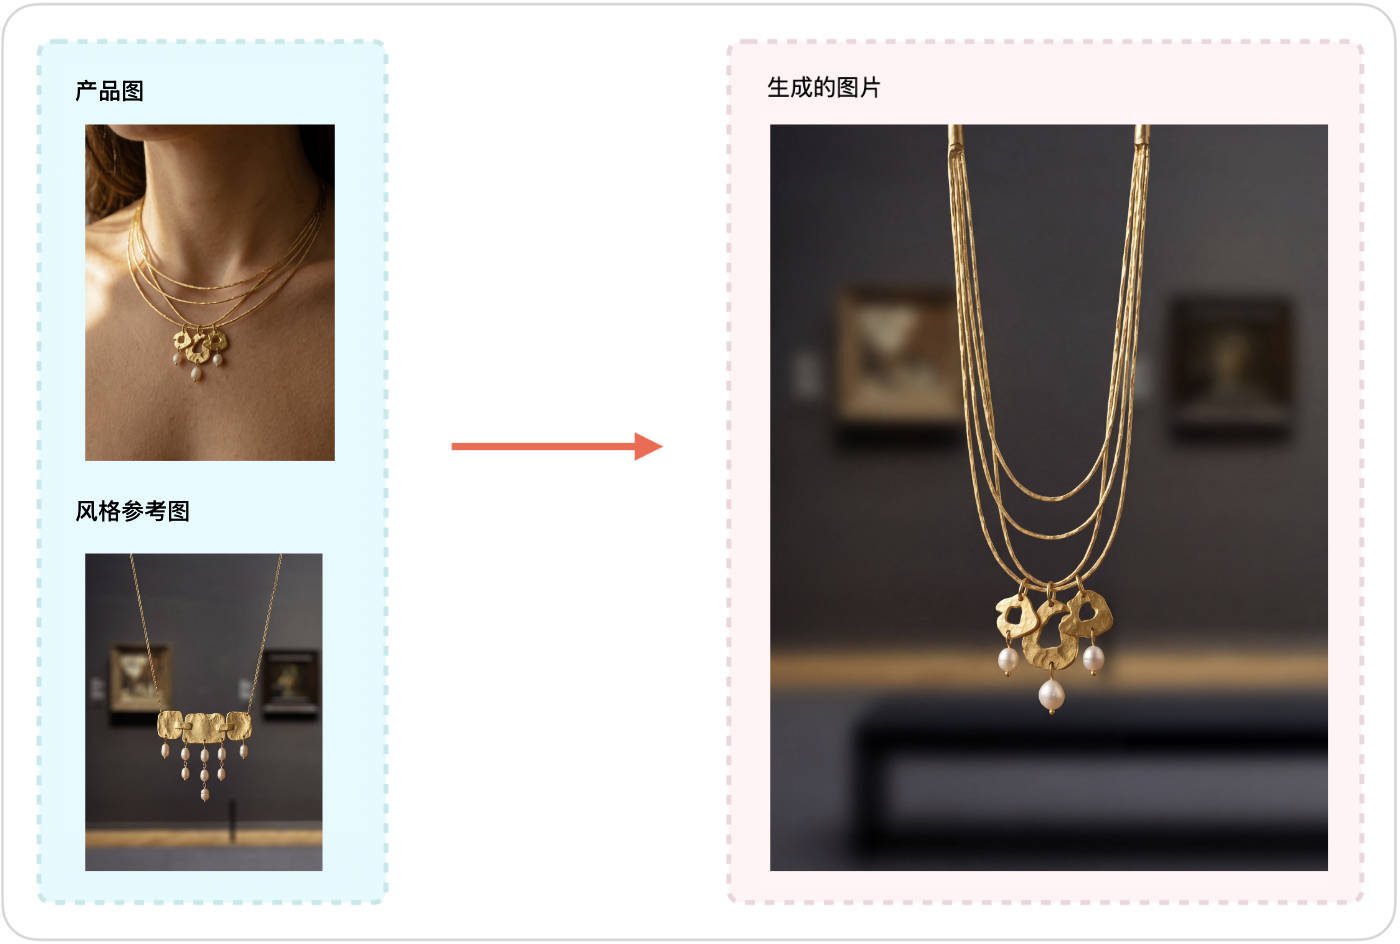
The AI Jewelry Lifestyle Photo Tool lets you blend earrings, necklaces, rings, and other jewelry products naturally into a style reference image. It replaces the original jewelry and creates polished lifestyle photos for product displays, marketing, and ecommerce.

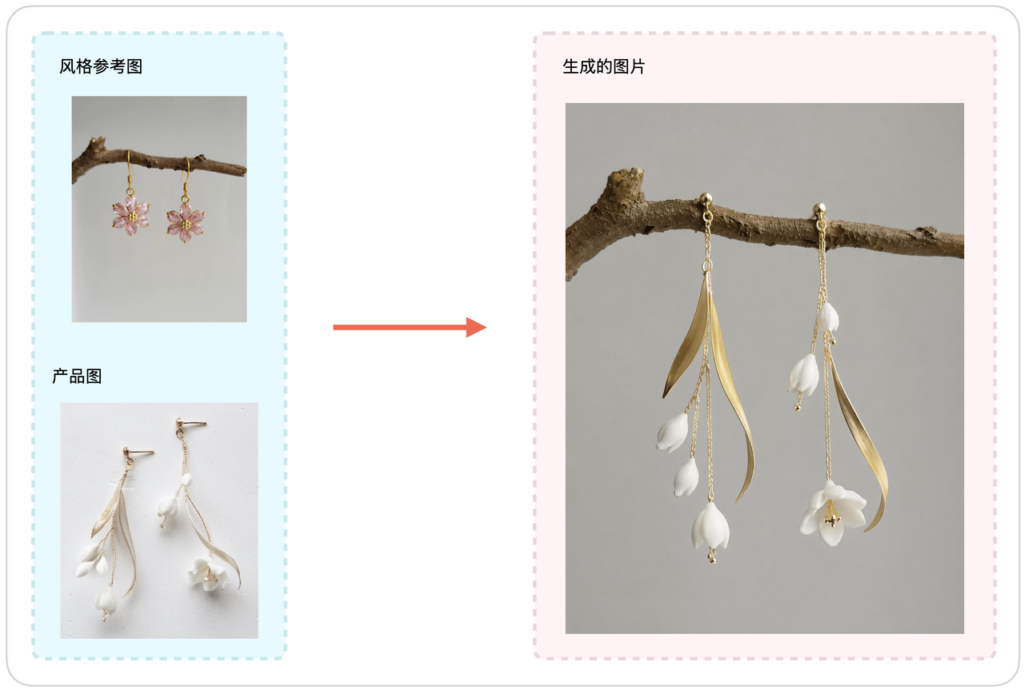
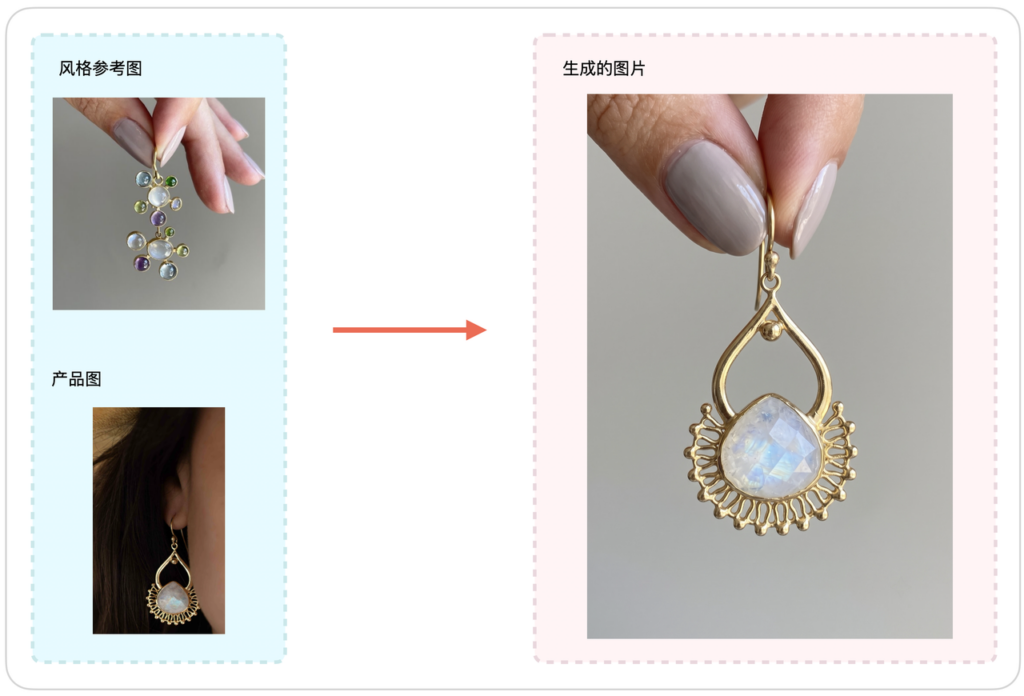
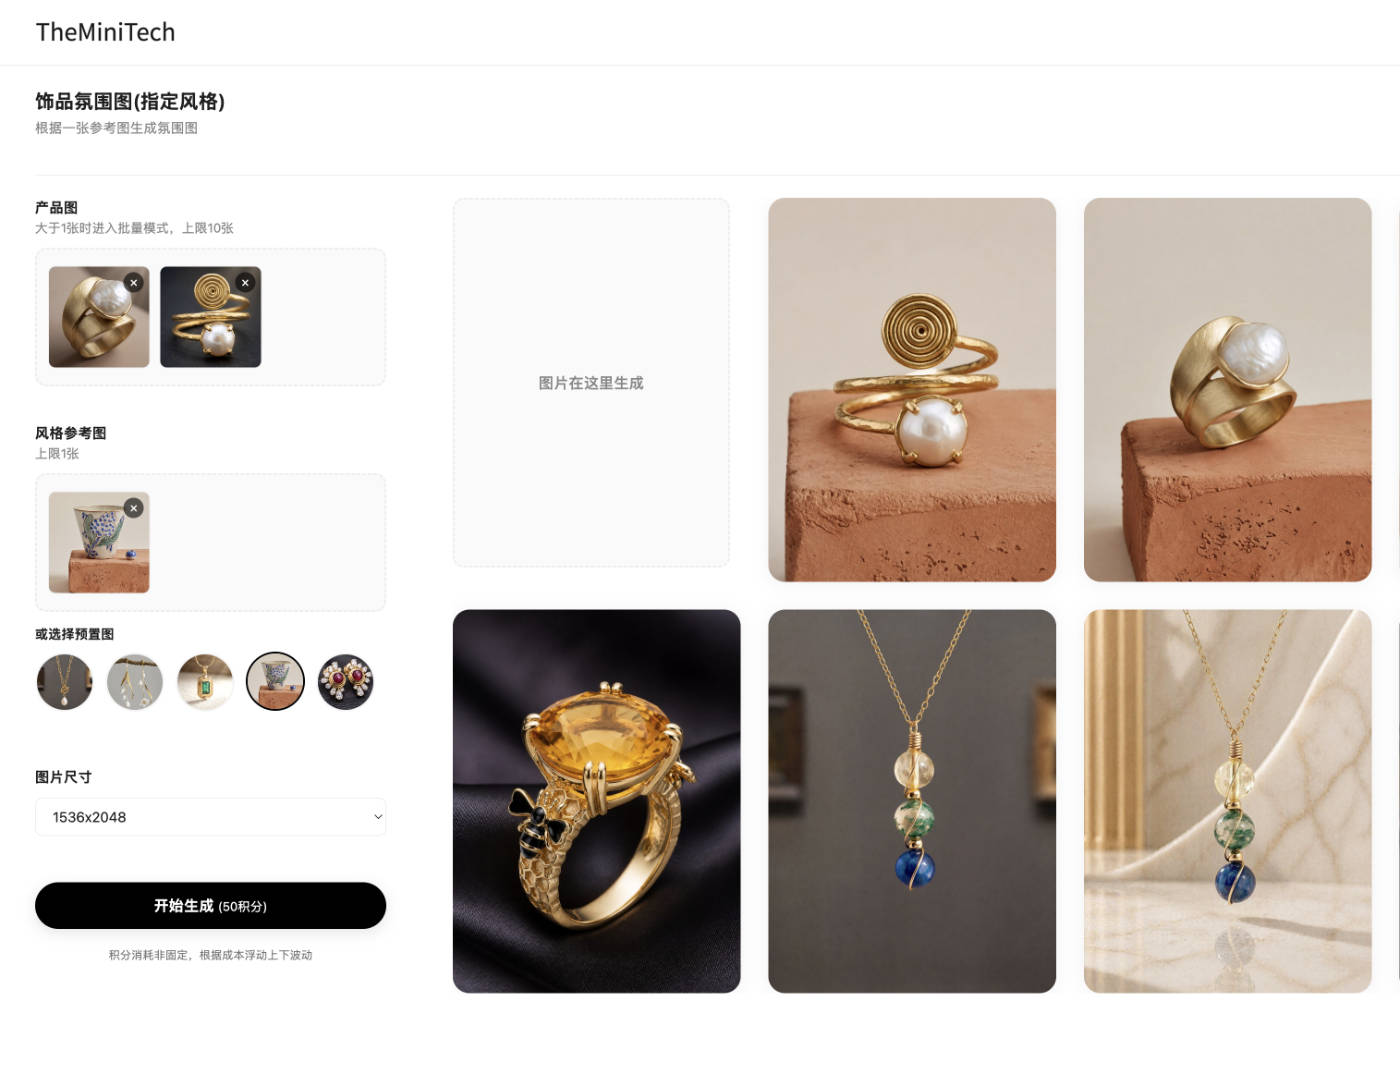
To get started, upload your jewelry product image as Image 1 and the lifestyle image you want to reference as Image 2. The tool preserves the reference image's overall composition and visual style while replacing its jewelry with your product. The steps below explain the complete process and how to generate multiple images in batch mode.

Step 1: Upload Your Jewelry Product Image as Image 1

Upload the jewelry product photo you want to place in a lifestyle scene to the Image 1 area. For a single image, upload one product photo. To process several products at once, upload multiple images and the tool will automatically switch to batch mode.

Use a sharp product photo with complete details and minimal obstruction. A clear source image helps the AI recognize the jewelry's shape, material, color, and design more accurately.

Step 2: Upload a Style Reference as Image 2

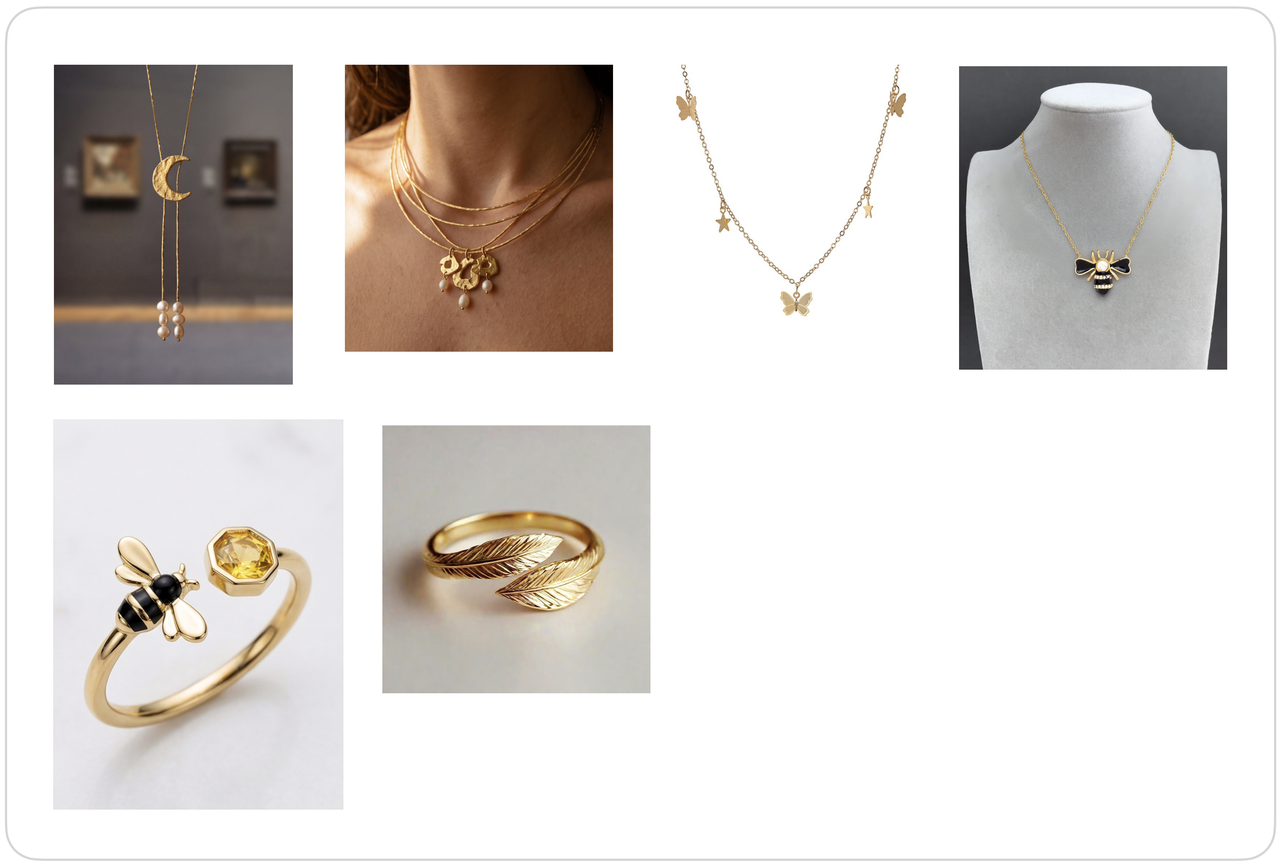
Upload a style reference to the Image 2 area. This image guides the composition, background, lighting, and overall mood of the generated result. The reference formats shown below are all supported.

Style reference examples supported by the AI Jewelry Lifestyle Photo Tool

Choose a high-quality reference image with a clearly positioned subject and a visible jewelry area. Results are generally more natural when the product and reference feature the same type of jewelry.

Step 3: Generate Your AI Jewelry Lifestyle Photo

Once both images are uploaded, start the generation process. The AI replaces the jewelry in the reference scene with your product while preserving the original lighting, person, background, and visual style as closely as possible. After generation, check the product's shape, placement, scale, and details to make sure the result looks natural.

AI Jewelry Lifestyle Photo Examples

Jewelry product replacement in an AI lifestyle photo example three

How to Use Batch Mode

Uploading more than one product image to Image 1 automatically activates batch mode. The tool pairs each jewelry product photo with the reference in Image 2 and generates a corresponding lifestyle image for every product. This is useful for quickly creating consistent visuals for an entire product collection.

Batch mode interface in the AI Jewelry Lifestyle Photo Tool

Tips for Better Results

  • Use a clear product image that shows the entire piece of jewelry without blur, heavy obstruction, or excessive glare.
  • Make sure the jewelry area in the reference image is easy to see so the AI can determine the correct size and placement.
  • Match the reference to the product type. For example, use an earring reference image when generating an earring lifestyle photo.
  • Before processing a large batch, test the reference with one product image to confirm that the style works well.

Summary

The AI Jewelry Lifestyle Photo Tool places jewelry products into reference scenes and reduces the time required for traditional photography and post-production. Clear product photos and suitable style references are the keys to natural-looking results, while batch mode makes it faster to create images for multiple products.

AI Product Photo Retouching Tutorial for Jewelry and Ecommerce Images

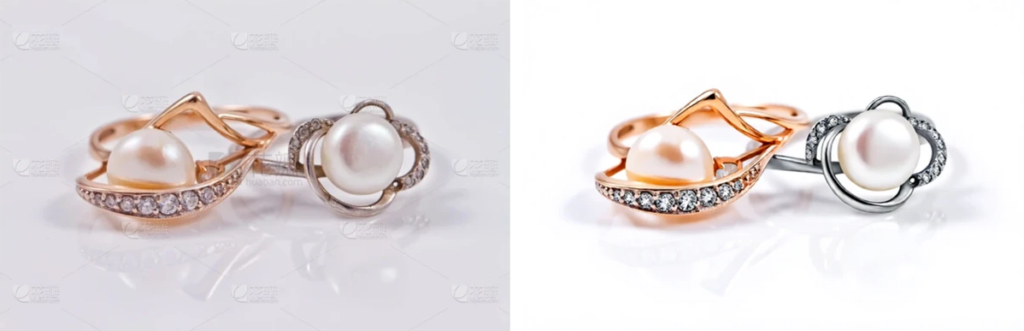
TheMiniTech AI image retouching tool is designed for commercial product photo enhancement, especially for jewelry, accessories, small products, and e-commerce product images. It can help remove visual impurities, improve clarity, enhance material texture, and adjust background details so that original product photos look more suitable for product pages, advertising images, and independent online stores.

This tutorial explains how to use the main settings of the AI image retouching web tool, including retouching strength, prompt writing, background dust removal, clay removal, white background, and clarity enhancement. These settings are especially useful when refining jewelry product photos for e-commerce display.

What Is the AI Image Retouching Tool Best For?

If your original product photo has dust, small impurities, a messy background, dull colors, weak texture, or insufficient sharpness, you can use this image retouching tool to improve it. For metal accessories, jewelry, watches, rings, earrings, and similar reflective products, retouching can often create a stronger commercial look.

The tool is suitable for sellers who need cleaner product images without a full manual editing workflow. It can help create more polished visuals for marketplace listings, Shopify-style stores, detail pages, social media product posts, and advertising creatives.

How to Set the Retouching Strength

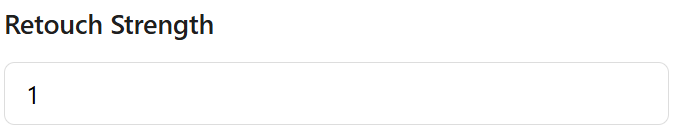
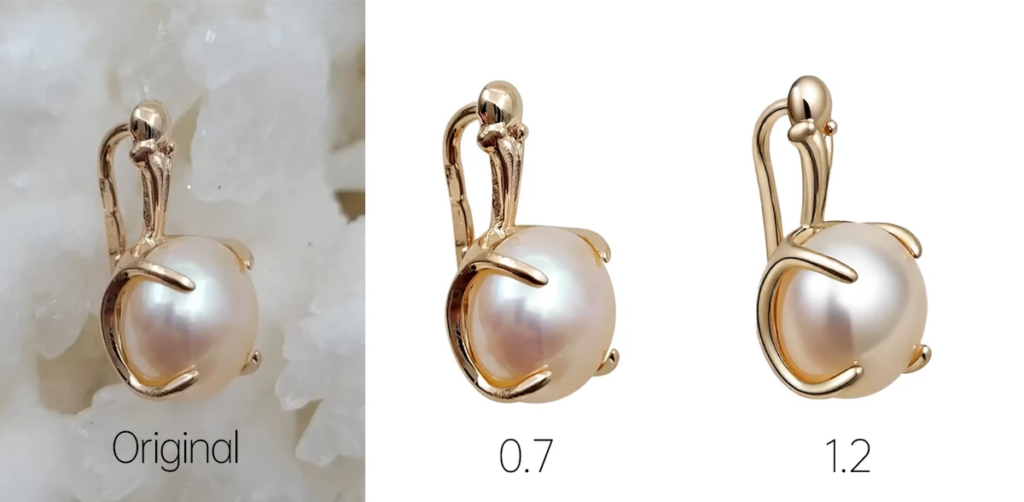
The retouching strength ranges from 0 to 2, and the default value is 1. This setting controls how strongly the tool enhances the image. A higher value usually produces a stronger retouching effect, such as more visible metallic highlights, richer colors, and a more polished commercial texture.

However, a higher value is not always better. If the retouching strength is too high, some product details may be lost, especially fine textures, edges, inlaid structures, gemstones, or small decorative parts. For most product photos, start with the default value of 1. If the result is too subtle, increase the value gradually.
How to Write a Good Retouching Prompt

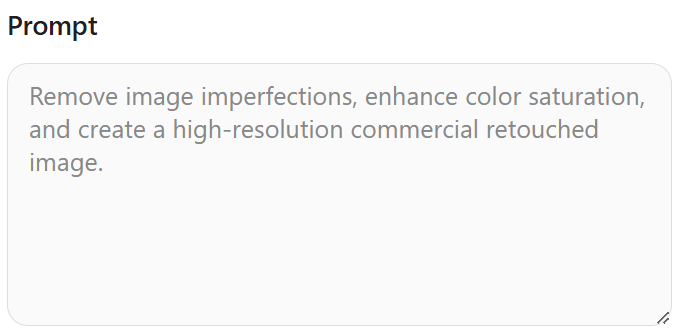
The default prompt is usually best to keep the structure of the default prompt because it already covers the most common retouching goals: cleaning the image, improving color, and generating a high-quality commercial result. If you do not want the colors to become too vivid, remove the phrase “enhance color saturation”

If the original image has background watermark text, lines, dust, or other unwanted marks, add a more specific instruction after the default prompt. For example:

Remove image impurities, increase color saturation, generate a high-definition commercial retouched image, and remove watermark text and background lines.

How to Remove Background Dust and Impurities

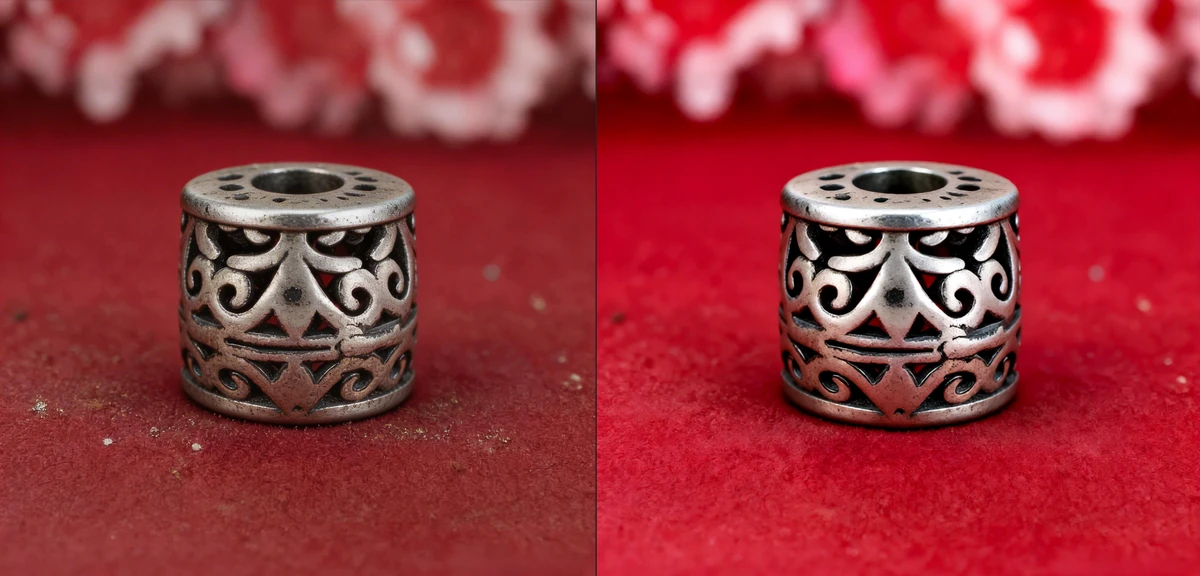
If the background contains dust, dirty spots, small particles, shooting marks, or other distractions, describe the problem clearly in the prompt. Useful instructions include “remove background dust,” “clean background impurities,” and “keep the product subject unchanged.”

This helps the AI focus on the background while reducing unnecessary changes to the product itself. For jewelry and accessories, this is important because the product shape, reflection, gemstone detail, and metal texture should remain accurate.

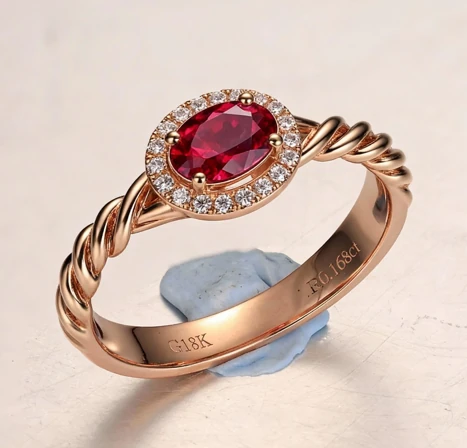
AI product photo retouching result after cleaning background impurities

When to Use the Clay Removal Option

When photographing jewelry, small products are often fixed with clay, adhesive putty, support glue, or hidden stands. If these support materials are visible in the image and you want to remove them, enable the clay removal option.

This option is especially useful for jewelry product photos, including rings, earrings, pendants, bracelets, and other small accessories. It helps clean the product presentation while keeping the main subject visually clear.
AI image retouching clay removal option setting

When to Choose a White Background

If you want the image background to become white, enable the white background option. This is useful for marketplace main images, product catalog photos, and e-commerce images that require a clean and consistent background.
If you want to keep the original scene, texture, or atmosphere of the photo, do not enable the white background option. The right choice depends on the final use of the image: white backgrounds are usually better for product main images, while lifestyle or detail page images may benefit from preserving the original background.

Should You Enable Clarity Enhancement?

Clarity enhancement is enabled by default and works well for most product photos. It can make the image sharper and more suitable for commercial display. If the result looks too sharp, the edges become too hard, or the product feels unnatural, turn this option off and generate again.

For reflective materials such as metal, jewelry, glass, and gemstones, start with the default setting first. Then adjust based on the output. This helps balance sharpness, texture, and realism.

Tips for Better AI Product Photo Retouching

  • Start with the default retouching strength of 1, then adjust gradually.
  • Do not set retouching strength too high at once, or product details may be lost.
  • Keep the default prompt structure and add specific instructions only when needed.
  • Clearly state whether you want to remove watermarks, dust, clay, or background impurities.
  • Use a white background for marketplace main images, and keep the original background for lifestyle or detail images.
  • If the output is too sharp, disable clarity enhancement and generate again.

Conclusion

The key to using the AI image retouching tool is choosing the right retouching strength and writing a clear prompt. The default strength of 1 works for most product photos. Increasing the value can enhance commercial texture, but it may also reduce fine details if pushed too far.

For jewelry and accessory product images, combine prompt instructions with options such as clay removal, white background, and clarity enhancement. With the right settings, you can create cleaner, sharper, and more professional retouched images for e-commerce product pages, ads, and independent store displays.

Try it here: AI image retouching web tool.

AI Jewelry Design Tutorial: Create Jewelry Designs with Reference Images

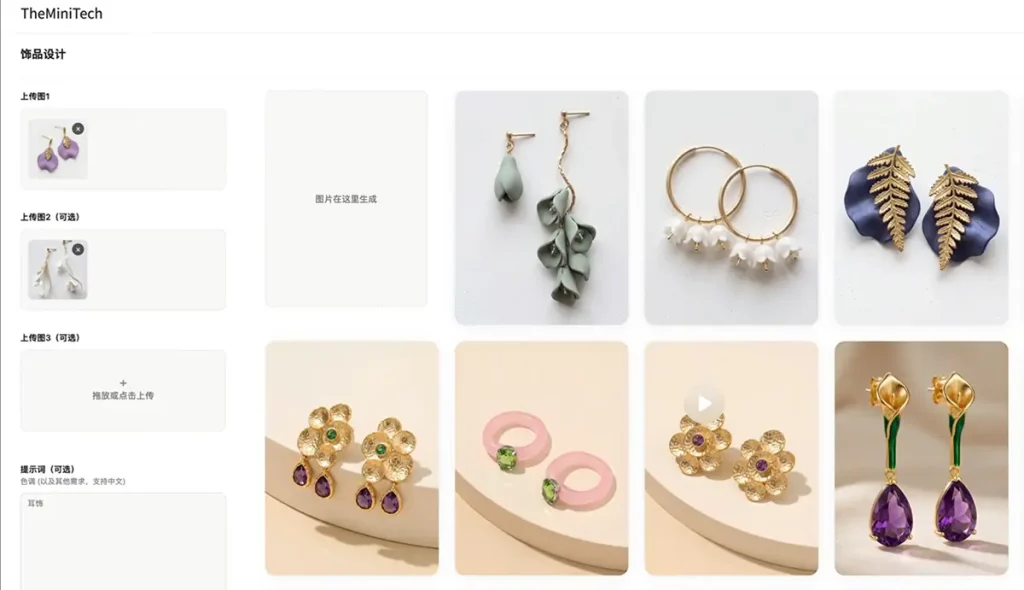
AI jewelry design makes it easier to explore new rings, earrings, necklaces, bracelets, and other jewelry concepts without creating every idea from scratch. In this AI Jewelry Design Tutorial, you’ll learn how to use TheMiniTech’s AI jewelry design tool with reference images, prompts, and batch mode to quickly generate multiple design concepts for product development, creative exploration, and ecommerce visuals.

To get better results, it is important to understand how the three image input groups work. Image 1 is required and acts as the main reference. Images 2 and 3 are optional reference images that can add extra style, angle, material, or design information. In normal mode, each generation creates 4 images.

How Does the AI Jewelry Design Tool Work?

AI jewelry design tool upload interface and reference image settings

Before generating jewelry design images, review these basic rules. They will help you avoid unstable results, incorrect uploads, or accidentally triggering batch mode.

  • Image 1 is required and must be uploaded.
  • Images 2 and 3 are optional and can be added when you need extra design references.
  • In normal mode, one generation produces 4 jewelry design images.
  • If multiple images are uploaded into Image 1, batch mode is automatically activated.
  • In batch mode, the number of batches equals the number of images inside Image 1.
  • Each batch outputs 4 generated images.

How to Use Reference Images for AI Jewelry Design

Image 1: The Required Main Reference Image

Image 1 is the core input for AI jewelry design generation. It must be uploaded because the AI uses it to understand the main product category, shape direction, material characteristics, and overall design style. For best results, choose the image that most clearly represents the jewelry concept you want to create.

If you want to generate ring designs, upload a ring reference image as Image 1. If you want earrings, necklaces, bracelets, or brooches, upload a main reference image from the matching product category. The clearer the image and the more obvious the subject, the easier it is for the AI to produce designs that match your expectations.

For SEO product visuals and e-commerce design drafts, Image 1 should not be too small, blurry, over-cropped, or covered by text. A clean reference gives the AI a stronger design foundation and improves consistency across the generated results.

Images 2 and 3: Optional Supplementary References

Images 2 and 3 are optional. They are best used when you want to add extra design information that Image 1 does not fully provide. For example, you can upload a style inspiration image, a different viewing angle, a material close-up, or another jewelry reference that suggests the look you want.

These supplementary images can help create more variation. If you want the final jewelry design to combine two styles, use Image 1 for the main product direction and Images 2 or 3 for additional style cues. This can be useful for mixing minimalist, luxury, vintage, modern, gemstone, pearl, or sculptural design elements.

How to Generate Jewelry Designs in Batch Mode

Batch mode is triggered automatically when multiple images are uploaded into Image 1. The number of batches is equal to the number of images inside Image 1. For example, if you add 3 images to Image 1, the system will create 3 batches, and each batch will output 4 images.

Batch mode is useful when you want to test several jewelry styles or reference directions at once. It can save time during early exploration, but it will also increase credit usage because each Image 1 reference becomes a separate batch.

How to Write AI Jewelry Design Prompts

In the prompt field, describe the product type you want to generate, such as earrings, necklace, ring, bracelet, pendant, brooch, or jewelry set. You can also add design direction, material, color, and mood when needed.

For example, instead of writing only “jewelry,” write a more specific prompt such as “modern pearl earrings,” “minimalist gold ring,” “luxury gemstone necklace,” or “silver bracelet with floral details.” A clearer prompt helps the AI understand the expected output and improves the relevance of the generated jewelry design images.

What Can You Create with AI Jewelry Design?

The AI jewelry design tool is suitable for new product exploration, creative brainstorming, e-commerce product image drafts, independent store visuals, social media product testing, and jewelry concept generation. It helps you compare different design directions quickly before choosing the strongest ideas for further refinement.

For designers and sellers, this workflow can shorten the early creative process. Instead of manually sketching every concept from scratch, you can generate multiple visual options, review the most promising designs, and then continue polishing the selected direction.

Can AI Jewelry Designs Be Used for Manufacturing?

TheMiniTech AI Jewelry Design is primarily designed for concept exploration and visual design generation. The generated images can be used for creative direction, product development, client discussions, and ecommerce visual planning, but they are not manufacturing-ready CAD or 3D model files. A professional jewelry designer or CAD specialist should review and develop the selected concept before production.

Conclusion

When using the AI jewelry design tool, remember the most important rule: Image 1 is required, while Images 2 and 3 are optional. In normal mode, one generation creates 4 images. If you upload multiple images into Image 1, the tool automatically enters batch mode, and each Image 1 reference becomes one batch.

For first-time users, it is best to start with one clear main reference image and test the result before expanding into batch generation. This makes it easier to control design quality, reduce unnecessary credit use, and generate jewelry design concepts that are closer to your creative goal.

Try it here: AI jewelry design tool.

How to Use AI Custom Mode for Image Editing

AI Custom Mode is designed for image-editing tasks that preset tools cannot handle. Instead of solving only one type of problem, it combines your source images with a text prompt, allowing AI to blend facial features, remove objects, change outfits, adjust poses, create virtual try-ons, and complete other custom edits.

If you have already tried the dedicated tools but need a more specific result, AI Custom Mode is a good place to start. The examples below explain how to use it and how to write clear prompts for common AI image-editing tasks.

What Is AI Custom Mode Best For?

AI Custom Mode works best for open-ended image editing. For example, you can preserve most of an image while changing one detail, or upload multiple reference images and ask the AI to combine a face, outfit, pose, or product into a single result.

For more consistent results, make your prompt specific. State what you want to change, what must remain unchanged, and what background or visual style you expect. The clearer your instructions are, the more control you will have over the final image.

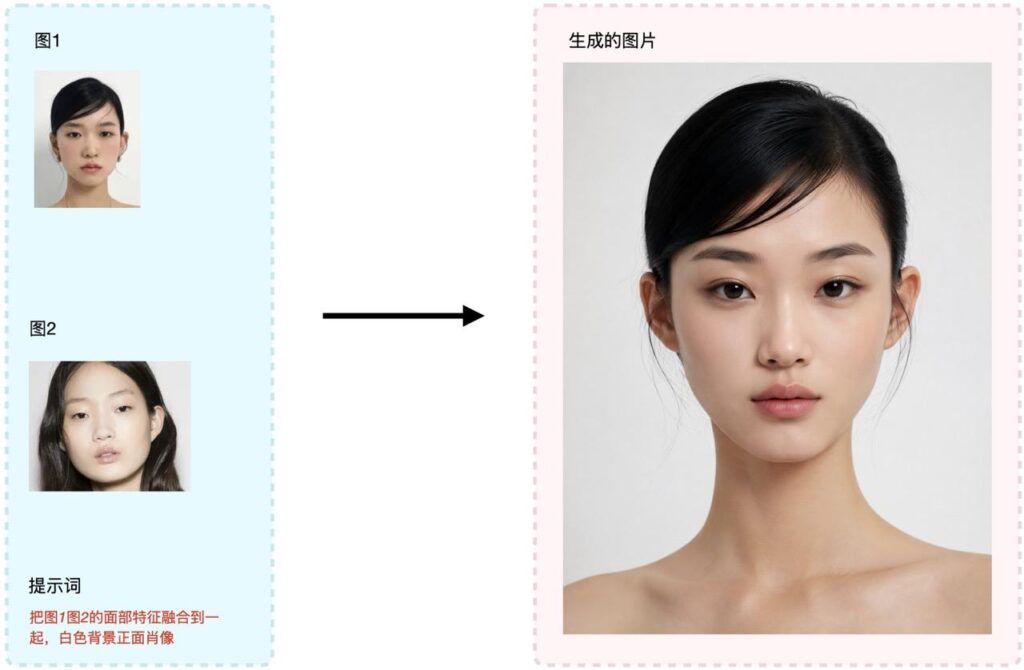
Example 1: Blend Facial Features

Face blending combines facial characteristics from two front-facing portraits. Upload one portrait as Image 1 and the other as Image 2, then describe the intended result in your prompt.

Blend the facial features from Image 1 and Image 2 into a single front-facing portrait on a white background.

For the best result, use clear, well-lit, front-facing portraits. Avoid side profiles, heavy obstructions, or images with dramatically different facial expressions.

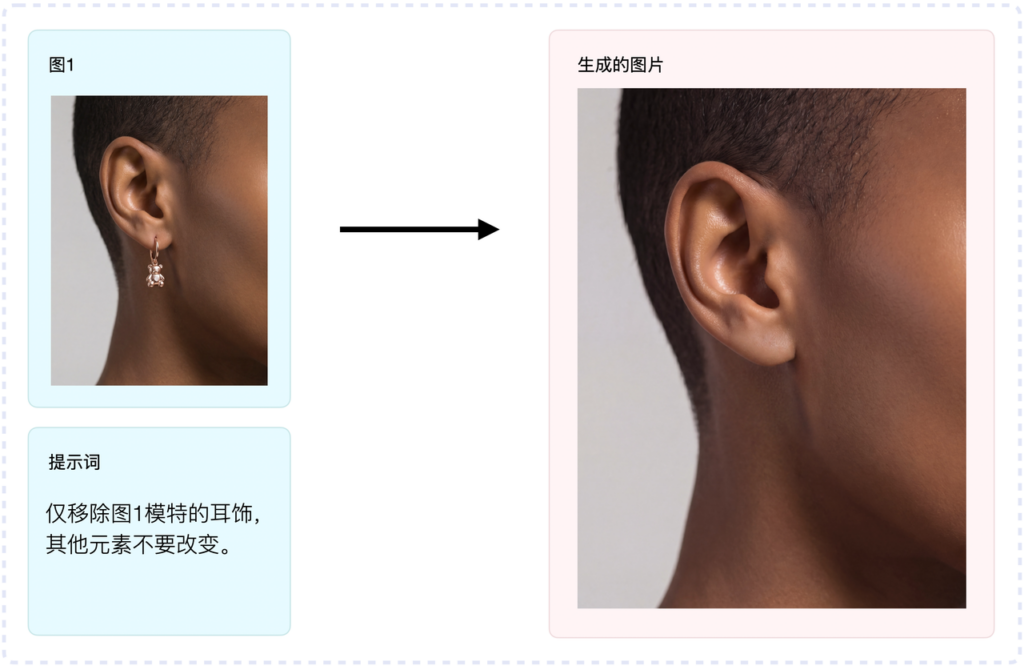
Example 2: Remove an Object

To remove an unwanted object, upload the source as Image 1 and name the exact item you want to erase. Tell the AI to preserve everything else to prevent unnecessary changes to the subject, clothing, or background.

Remove only the model's earrings from Image 1. Keep every other element unchanged.

The phrases “remove only” and “keep every other element unchanged” help limit the edit to the selected object.

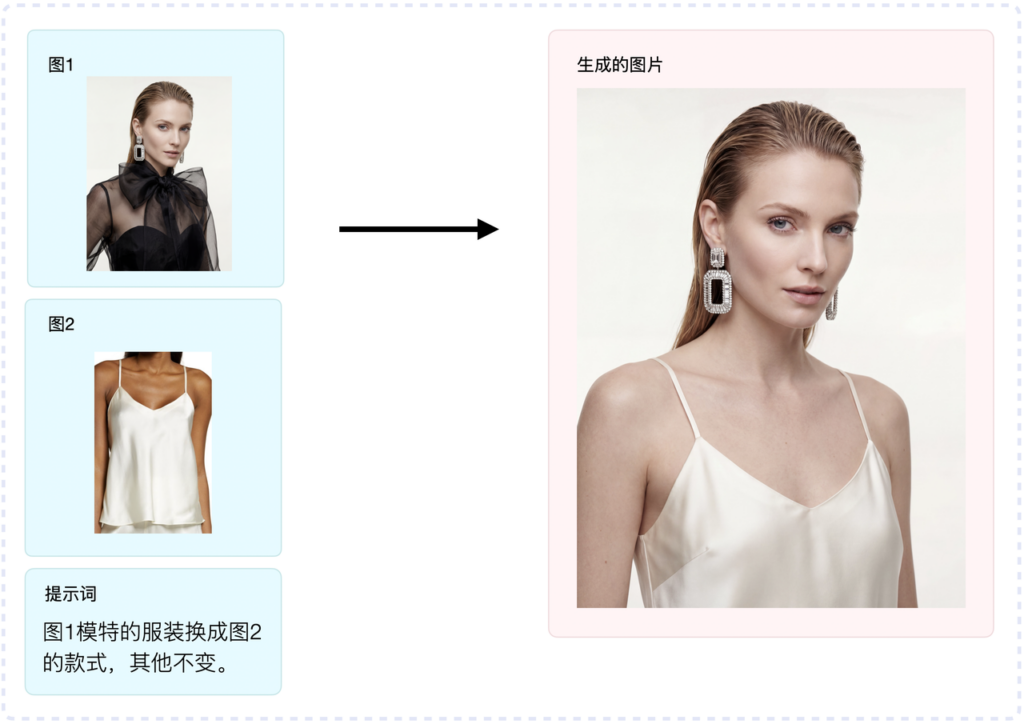
Example 3: Change an Outfit

For an outfit change, use Image 1 for the person and scene, and Image 2 as the clothing reference. Ask the AI to replace the model's outfit with the style in Image 2 while preserving the rest of the original image.

Replace the model's outfit in Image 1 with the outfit shown in Image 2. Keep everything else unchanged.

If the garment has a complex structure, use a high-resolution reference image that clearly shows its cut, color, texture, and details.

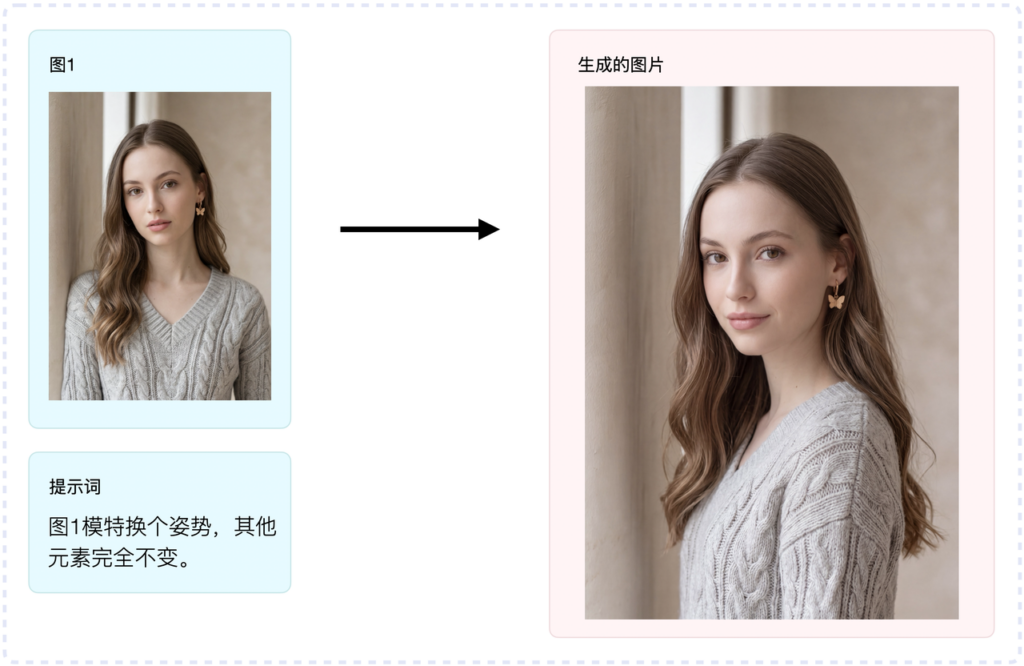
Example 4: Change a Person's Pose

Pose editing lets you change a model's body position while preserving the person, clothing, and overall background style. A simple prompt can be enough:

Change the model's pose in Image 1. Keep all other elements exactly the same.

If you have a specific pose in mind, add details such as “standing,” “sitting,” “turned to the side,” or “holding a handbag.” If not, simply asking for a different pose allows the AI to choose a natural alternative.

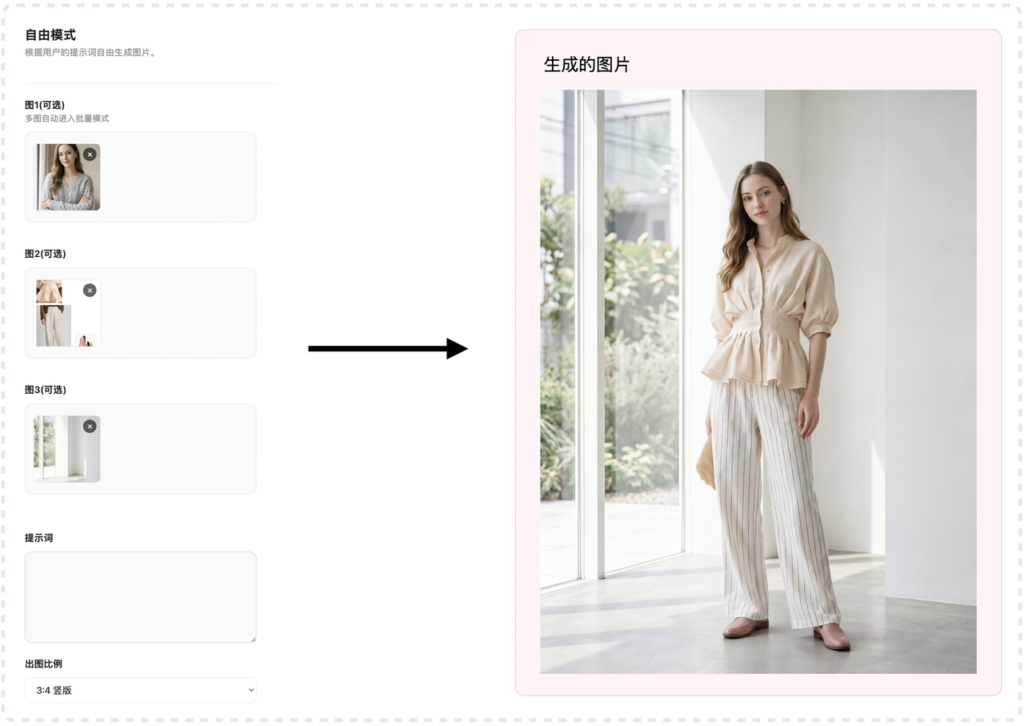
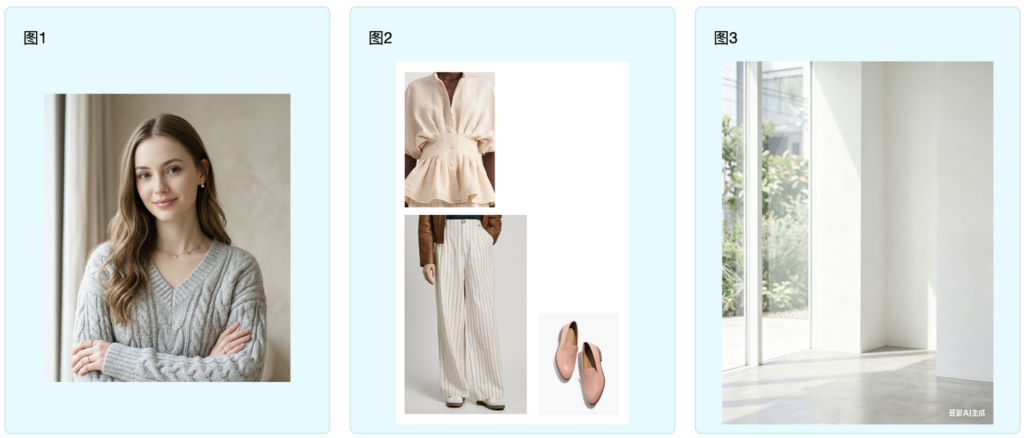
Example 5: Create a Virtual Try-On

A virtual try-on places a reference garment onto a person. A prompt is optional, but a short instruction such as “Dress the model in the reference outfit while keeping the pose and background unchanged” can make the result more predictable.

The clothing reference does not have to be worn by another model; a clean product image on a white background can also work. However, an on-model photo may help the AI understand the garment's shape, drape, and fit more accurately.

The enlarged example below shows the details of the generated garment and how naturally it blends with the model.

Tips for Better AI Custom Mode Results

  • Clearly state what you want to change and what you want to preserve.
  • For a localized edit, include an instruction such as “keep every other element unchanged.”
  • When uploading multiple images, explain the role of Image 1, Image 2, and any additional references.
  • Use sharp, well-lit portraits, clothing references, and product images with minimal obstruction.
  • If the first result is inconsistent, reduce the scope of the edit and complete complex changes in separate steps.

Summary

AI Custom Mode offers a flexible way to handle custom image-editing tasks, including face blending, object removal, outfit replacement, pose changes, and virtual try-ons. The key to better results is a precise prompt: define the role of each input image, describe the intended change, and identify every element that should remain untouched.

AI Multi-Pose Generator Tutorial: Create 4 Pose Images from One Person Photo

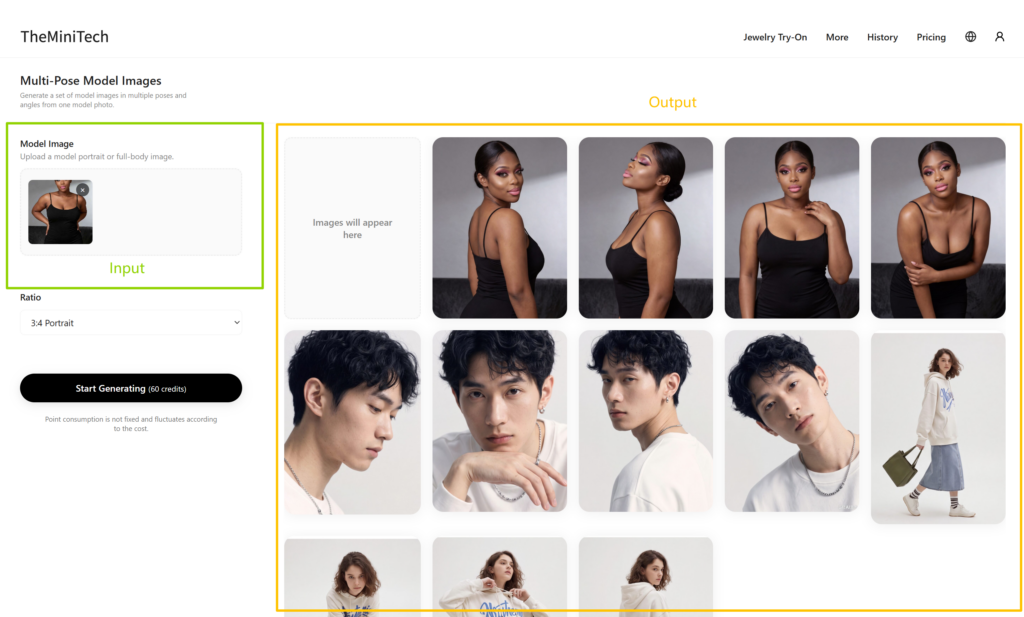
The AI Multi-Pose Generator can turn one person image into a set of 4 images with different poses. It is useful for character image expansion, model pose variation, fashion display, e-commerce product visuals, social media content, AI portrait references, and brand visual testing.

If you already have a clear person photo but need more pose variations, such as standing, sitting, side-facing, half-body, or full-body angles, this tool can help create a wider set of usable visuals. For more stable results, prepare a clear input image and manually choose a specific output aspect ratio.

AI multi-pose generator example showing 4 different poses from one person image

What Is the AI Multi-Pose Generator Best For?

The main purpose of the AI Multi-Pose Generator is to expand one reference image into multiple images with different body poses. It helps you quickly create more visual variations without arranging a new photoshoot.

  • Create different standing, sitting, side-facing, or display poses for model images.
  • Generate more model angles for fashion, accessories, outfits, and e-commerce product images.
  • Prepare visual assets for social media, product detail pages, advertising images, and brand content.
  • Create additional pose references for AI portraits, virtual models, and character design.

Upload a Person Image

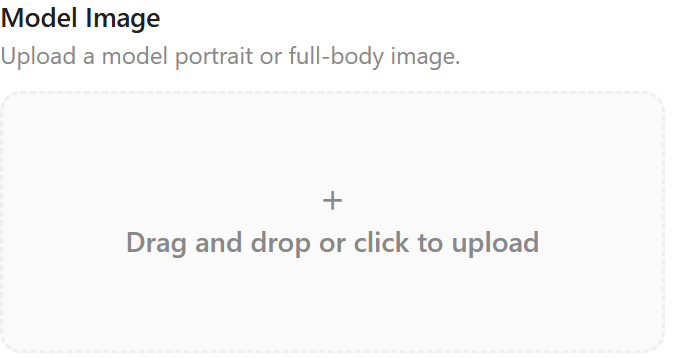
Upload a person image for AI multi-pose generation

Click the plus button in the upload area to select a person image from your local computer. You can also drag and drop the image directly into the upload area. The tool supports common image formats such as JPG and PNG.

For best results, use a clear image where the person is complete and easy to identify. The face, body outline, clothing details, and overall silhouette should not be too blurry. A recommended image size is around 1000 px to 2000 px in width or height. The clearer the input image is, the easier it is for the AI to understand the body structure, clothing shape, and pose direction.

If you want the 4 generated pose images to maintain better character consistency, use a single-person photo from the front or a slight side angle. Avoid group photos, heavily occluded bodies, overly complex backgrounds, or images where the person appears too small.

Set the Output Aspect Ratio

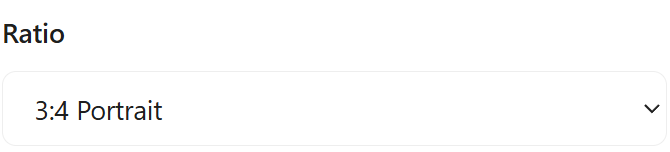
AI multi-pose generator aspect ratio setting option
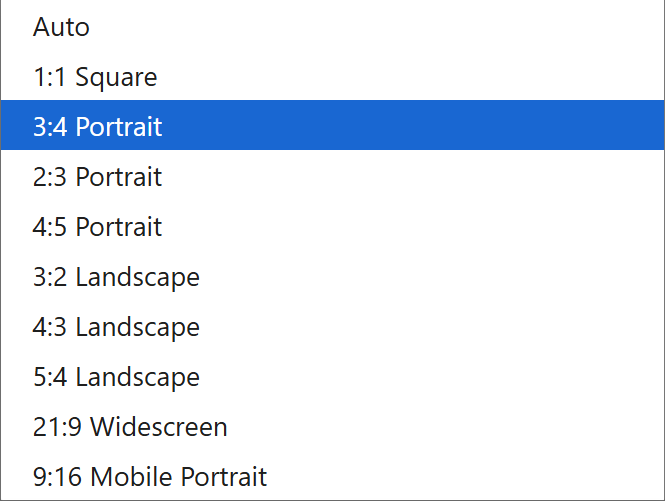
Choose a specific aspect ratio for multi-pose person image generation

After uploading the image, choose the output aspect ratio from the dropdown menu. It is best to select a clear ratio instead of relying on Auto. Auto will often follow the input image ratio, but it may also produce an output size that does not match your expected layout.

If you need vertical images for social media covers or portrait-style content, choose a vertical ratio. If the images will be used for e-commerce detail pages, model display, or visual references, choose a horizontal, vertical, or original-like ratio based on your page layout. A specific ratio makes the final images easier to use in design and publishing workflows.

Generate 4 Pose Images from One Person Photo

Once the image is uploaded and the aspect ratio is set, click the start generation button. One generation usually takes about 2 minutes. When the task is complete, 4 person images with different poses will appear on the right side of the page.

The generated results may vary in pose, composition, movement, and clothing detail. You can choose the most suitable image from the 4 outputs and use it for product images, social media content, character references, or further editing.

Tips for Better Multi-Pose Generation Results

  • Upload a clear, single-person image with a complete subject.
  • Avoid heavy occlusion, group photos, messy backgrounds, or images where only a small part of the body is visible.
  • Choose a specific aspect ratio based on the final use case instead of defaulting to Auto.
  • For e-commerce or fashion display, use an input image with clear clothing outlines and even lighting.
  • If the result is unstable, try a clearer person image or adjust the output ratio before generating again.

Conclusion

The AI Multi-Pose Generator can expand one person image into 4 different pose images. It is useful for model pose variation, fashion display, e-commerce visual assets, social media content, and AI character reference generation. The most important steps are uploading a clear and complete person image and choosing a specific output aspect ratio.

If you want to quickly create a richer set of pose variations for future design, display, or marketing use, start with one high-quality person photo, review the generated results, and then adjust the input image or aspect ratio as needed.

Try the AI Multi-Pose Generator

AI Glasses Try-On Tool Tutorial: Create Virtual Eyewear Model Images

AI Glasses Try-On helps eyewear sellers create realistic model-wearing images from a glasses product photo. In this AI Glasses Try-On Tutorial, you’ll learn how to prepare eyeglasses or sunglasses images, use an optional model photo, write effective prompts, and generate more natural virtual eyewear try-on results.

The tool is designed for eyewear ecommerce sellers, independent stores, product marketers, and designers who need model images for glasses, sunglasses, optical frames, and fashion eyewear without arranging a new photoshoot for every product.

What Is AI Glasses Try-On and How Does It Work?

For glasses, sunglasses, optical frames, and fashion eyewear, a standalone product photo is often not enough. Customers usually want to see how the frame looks on a face, including size, proportion, style, and overall impression. The AI glasses try-on tool places the eyewear product on a model’s face and generates a more realistic wearing effect image.

These images can be used for product pages, advertising creatives, social media content, style testing, and e-commerce visual previews. They are especially helpful when you need to evaluate how different frame styles look before creating final product photography.

How to Prepare Images for AI Glasses Try-On

1. Glasses Product Image Requirements

The glasses product image is the core input for generating a virtual try-on result, so it must be uploaded. Choose an image where the glasses are clear, complete, front-facing or close to front-facing, and not heavily distracted by the background.

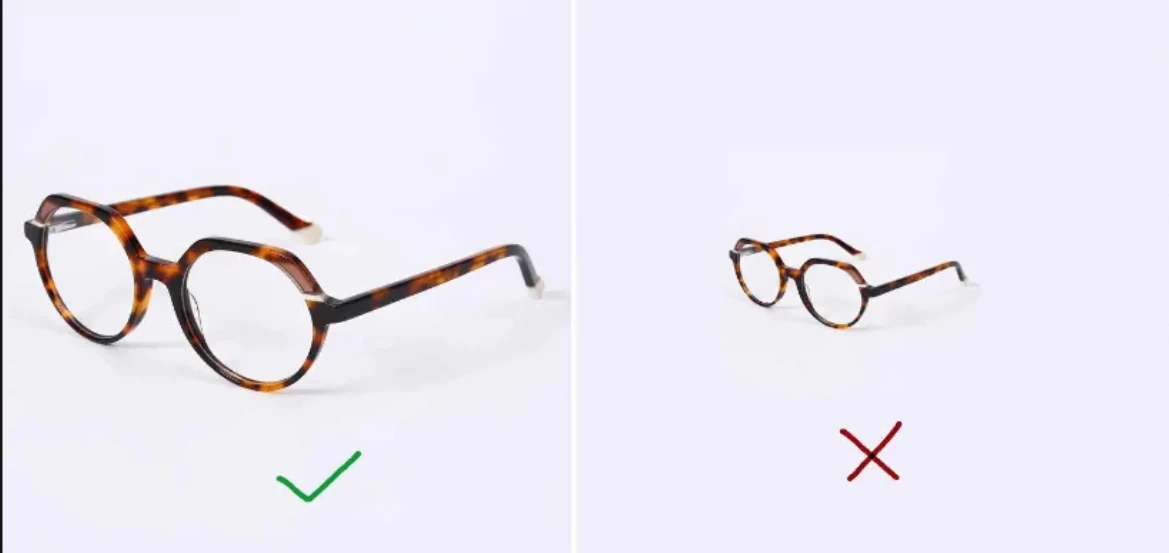
For better results, the glasses should fill as much of the frame as possible. This makes it easier for the AI to recognize the frame outline, lens shape, material, color, and fine product details.

AI glasses try-on product image example

2. Is a Model Photo Required?

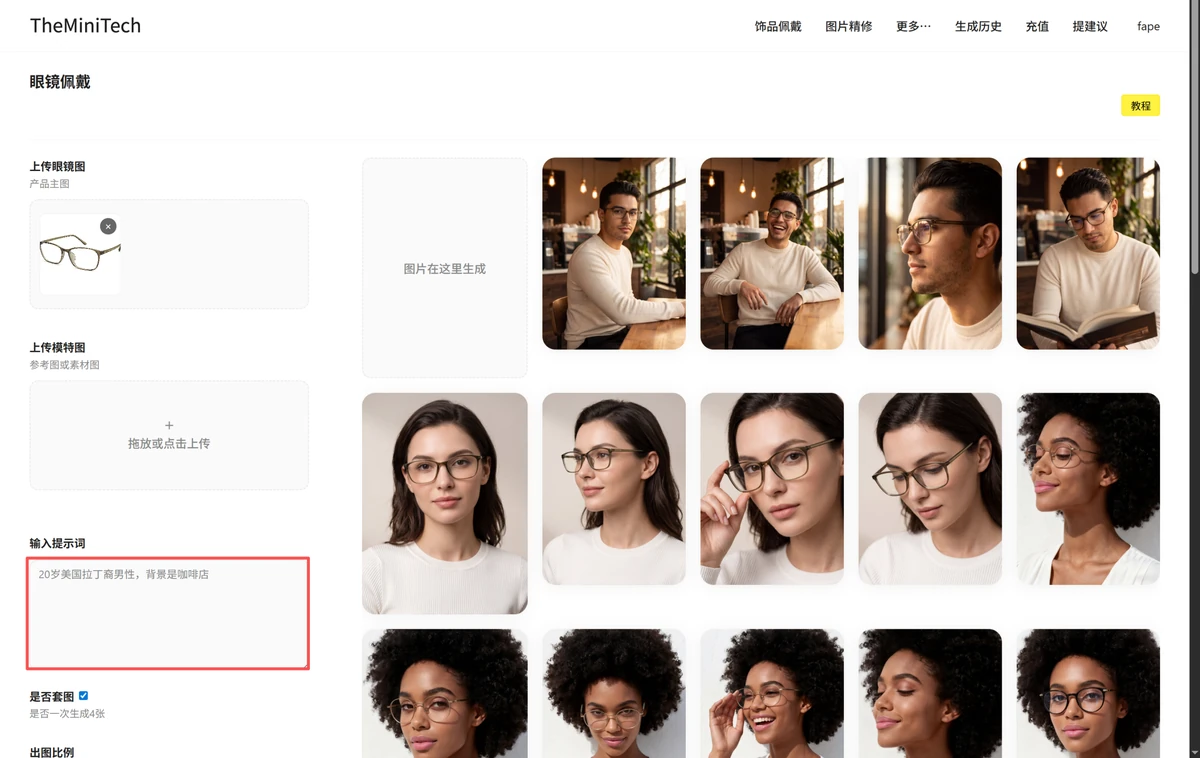
The model image is optional. If you already have a specific model or want to keep a particular person’s appearance, you can upload a model image. If you do not have a model image, you can describe the model in the prompt and let the AI generate a suitable person automatically.

Uploading a model image is helpful when you need a consistent brand model, a specific face shape, or a known audience style. Using only a prompt is more flexible when you want to test different demographics, scenes, or fashion moods.

3. Supported Image Formats

The tool supports common input formats including JPG, PNG, SVG, and WEBP. Before uploading, make sure the image is clear and easy to identify. Avoid files that are heavily compressed, too dark, overly reflective, or where the glasses are too small in the frame.

How to Write AI Glasses Try-On Prompts

The prompt can describe the model and background, especially when you do not upload a model image. You can specify age, gender, ethnicity, style, scene, and background. For example:

20-year-old Latin American man, coffee shop background

The prompt does not need to be long. Focus on the model characteristics and the background scene. If you only want to highlight the eyewear product, keep the prompt simple and avoid adding too many unrelated details.

AI glasses try-on tool prompt setting example

Generated Results and Saving Notes

AI-generated images may occasionally contain small issues, such as unnatural frame placement, unusual facial occlusion, or product details that are not fully accurate. If this happens, generate the image again. A second attempt often produces a better result.

After the image is generated, download it to your local device as soon as possible. Server-side generated images are saved for about two weeks by default, and during testing there may still be a risk of file loss. Do not rely only on the online link for long-term storage.

How to Get Better AI Glasses Try-On Results

  • Make the glasses product large enough in the input image.
  • Use a front-facing or slightly angled glasses image to reduce complex perspective problems.
  • If you want a specific audience, describe age, gender, ethnicity, and style in the prompt.
  • For a more commercial look, add background scenes such as a coffee shop, street style, office, or outdoor sunlight.
  • Download the generated image promptly to avoid temporary server file expiration or loss.

AI Glasses Try-On for Ecommerce Sellers

AI glasses try-on can be used to create model-wearing images for eyewear product pages, online stores, advertising creatives, social media posts, and style testing. Instead of arranging a separate model photoshoot for every frame, sellers can start with an existing glasses product image and generate different model or lifestyle presentations.

Conclusion

The AI glasses try-on tool helps eyewear products quickly generate realistic model-wearing images. The most important step is uploading a clear, complete, and large enough glasses product image. The model image is optional and can be added when you need a specific person or brand model.

If you do not upload a model image, use the prompt to describe the person and background. If the generated result occasionally looks wrong, try generating again and remember to download the final image as soon as it is ready.

FAQ

What is AI Glasses Try-On?

AI Glasses Try-On uses artificial intelligence to place glasses or sunglasses from a product image onto a model or portrait, creating a realistic eyewear-wearing image.

Do I need a model photo for AI Glasses Try-On?

No. A model image is optional. You can upload a specific model when you want to preserve a particular appearance, or describe the desired model in the prompt and let AI generate one.

What type of glasses image works best?

Use a clear, complete, front-facing or slightly angled product photo. The glasses should occupy a large part of the image so AI can recognize the frame shape, lenses, material, and details more accurately.

Can I use AI Glasses Try-On for sunglasses?

Yes. The tool can be used for eyeglasses, sunglasses, optical frames, and other fashion eyewear.

How can I make AI glasses try-on results more realistic?

Use a clear product image, avoid overly complex angles, choose a suitable model photo, and keep prompts focused on the model and background. If frame placement looks incorrect, generating another result may improve the output.

Try it here: AI glasses try-on tool.