
The AI jewelry design tool is built for quickly generating design concepts and visual ideas for earrings, rings, necklaces, bracelets, brooches, and other jewelry products. It is useful for style exploration, product concept testing, e-commerce visual drafts, and early-stage creative direction.
To get better results, it is important to understand how the three image input groups work. Image 1 is required and acts as the main reference. Images 2 and 3 are optional reference images that can add extra style, angle, material, or design information. In normal mode, each generation creates 4 images.
Core Rules of the AI Jewelry Design Tool
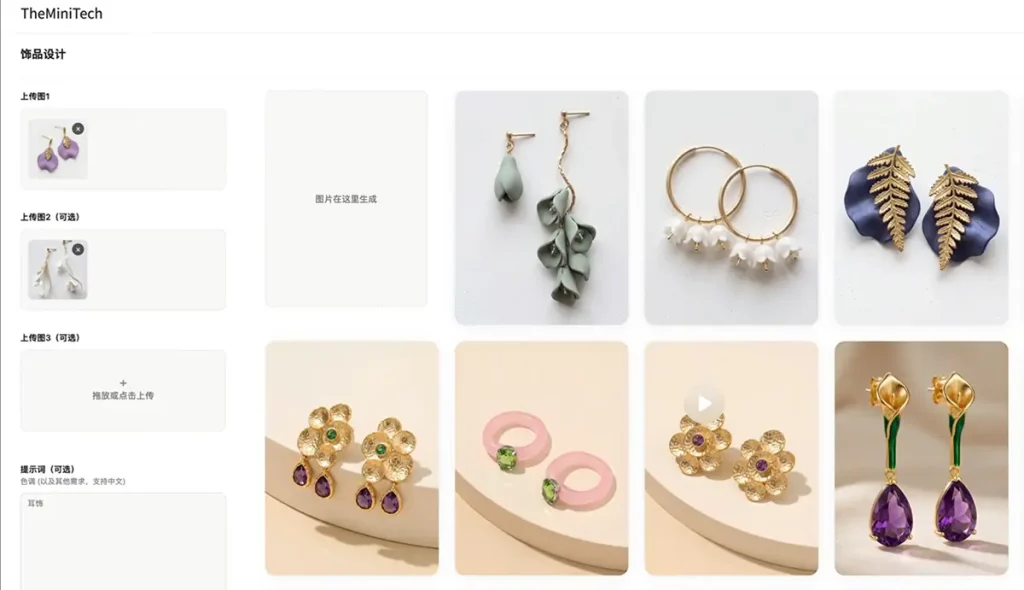
Before generating jewelry design images, review these basic rules. They will help you avoid unstable results, incorrect uploads, or accidentally triggering batch mode.
- Image 1 is required and must be uploaded.
- Images 2 and 3 are optional and can be added when you need extra design references.
- In normal mode, one generation produces 4 jewelry design images.
- If multiple images are uploaded into Image 1, batch mode is automatically activated.
- In batch mode, the number of batches equals the number of images inside Image 1.
- Each batch outputs 4 generated images.
Image 1: The Required Main Reference Image
Image 1 is the core input for AI jewelry design generation. It must be uploaded because the AI uses it to understand the main product category, shape direction, material characteristics, and overall design style. For best results, choose the image that most clearly represents the jewelry concept you want to create.
If you want to generate ring designs, upload a ring reference image as Image 1. If you want earrings, necklaces, bracelets, or brooches, upload a main reference image from the matching product category. The clearer the image and the more obvious the subject, the easier it is for the AI to produce designs that match your expectations.
For SEO product visuals and e-commerce design drafts, Image 1 should not be too small, blurry, over-cropped, or covered by text. A clean reference gives the AI a stronger design foundation and improves consistency across the generated results.
Images 2 and 3: Optional Supplementary References
Images 2 and 3 are optional. They are best used when you want to add extra design information that Image 1 does not fully provide. For example, you can upload a style inspiration image, a different viewing angle, a material close-up, or another jewelry reference that suggests the look you want.
These supplementary images can help create more variation. If you want the final jewelry design to combine two styles, use Image 1 for the main product direction and Images 2 or 3 for additional style cues. This can be useful for mixing minimalist, luxury, vintage, modern, gemstone, pearl, or sculptural design elements.
How Batch Mode Is Triggered
Batch mode is triggered automatically when multiple images are uploaded into Image 1. The number of batches is equal to the number of images inside Image 1. For example, if you add 3 images to Image 1, the system will create 3 batches, and each batch will output 4 images.
Batch mode is useful when you want to test several jewelry styles or reference directions at once. It can save time during early exploration, but it will also increase credit usage because each Image 1 reference becomes a separate batch.
How to Write the Prompt
In the prompt field, describe the product type you want to generate, such as earrings, necklace, ring, bracelet, pendant, brooch, or jewelry set. You can also add design direction, material, color, and mood when needed.
For example, instead of writing only “jewelry,” write a more specific prompt such as “modern pearl earrings,” “minimalist gold ring,” “luxury gemstone necklace,” or “silver bracelet with floral details.” A clearer prompt helps the AI understand the expected output and improves the relevance of the generated jewelry design images.
Best Use Cases for AI Jewelry Design
The AI jewelry design tool is suitable for new product exploration, creative brainstorming, e-commerce product image drafts, independent store visuals, social media product testing, and jewelry concept generation. It helps you compare different design directions quickly before choosing the strongest ideas for further refinement.
For designers and sellers, this workflow can shorten the early creative process. Instead of manually sketching every concept from scratch, you can generate multiple visual options, review the most promising designs, and then continue polishing the selected direction.
Conclusion
When using the AI jewelry design tool, remember the most important rule: Image 1 is required, while Images 2 and 3 are optional. In normal mode, one generation creates 4 images. If you upload multiple images into Image 1, the tool automatically enters batch mode, and each Image 1 reference becomes one batch.
For first-time users, it is best to start with one clear main reference image and test the result before expanding into batch generation. This makes it easier to control design quality, reduce unnecessary credit use, and generate jewelry design concepts that are closer to your creative goal.
Try it here: AI jewelry design tool.